Hello! I customize blythe dolls for both fun and for some profits. So far I have been doing it for just a little over year. I started when I was 15 and my first doll was quite terrible (as I wasn’t very careful), but I got better and better with every doll,and have now done 20+ dolls. So here is a tutorial for re-coloring or customizing the lips of a Blythe doll, hope you like it!
Step 1
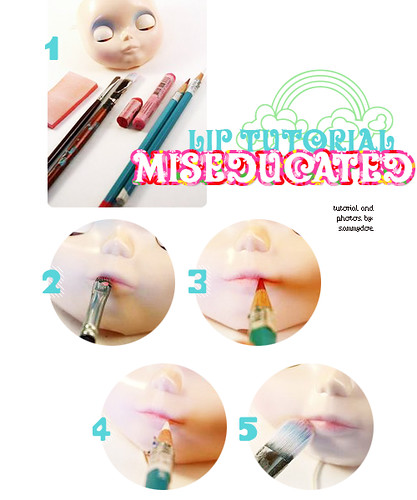
Gather your supplies: Blythe, fine-grit sanding sponge, a small flat paint-brush and a bigger softer paint-brush, chalk pastels in a lighter and darker color, and watercolor-pencils in a darker color and white.
Step 2
Sand off the original lip color (you may have to scrape the paint in the crease away with a some-what dull x-acto knife). With the small paint-brush, brush the darker pastel color in the crease of the lips and lightly outward.
Step 3
Use the darker watercolor-pencil to define the crease and add some lip wrinkles.
Step 4
Use the white watercolor-pencil to add texture with quick strokes, and lightly color with it to blend with the darker color.
Step 5
Brush the lighter color pastel on with the bigger paintbrush and you’re done!
… and it make take a few tries to get it right, so don’t get frustrated! 😉


9 Comments
Where do you get heads and bodies for customization?
Hey you!
I’ve got a one step solution to your two step problem.
Step #1: Open up your internet browser.
Step #2: Type into the URL bar with no spaces http://www.ebay.com
Step #3: Once the page loads, click on the search bar, which should be located about a third of the way down the page, and type in “Blythe doll”… make sure “Blythe doll” is in quotations.
Step #4: Scroll through listings until you find a listing that seems appealing to you.
Step #5: Click on it, and buy it!
And look at that! You have the head AND the body. Both your problems are solved.
Couldn’t have said it better myself!
Hello!
I really love the subtlety of the pastel & watercolour lips; plus the tiny details. I’m definitely going to try it myself. I only have one question:
Don’t you need to use some sort of a sealant after painting the lips to keep the colour on? And if so, how do you do it: do you use a brush-on or a spray etc.?
aluciana – Yes. Spray with “MSC Flat UV Cut” spray (type into browser) to seal and then you can paint with a gloss glaze if you like.
i wanted to know do you wet the water color pencils or do you use them dry…
Easier for me to keep them dry and powdery for shading. Water will be harder to seal. You can always use water though just wait for it to dry before sealing.
What brand of pastels do you recommend?
[…] tips on Miseducated’s blog was super helpful! I basically followed the blogger’s instructions on how to paint the lips. […]