Browsing Tag

craft

Crafts DIY

Lace for Your Jewelry: Resin Pendant Tutorial

11/15/2018

Resin can be a fun hobby or business for the crafty miseducated diva in all of us. The possibilities are endless, allow your creativity to run wild and create pieces that are quite unique and fun. With some initial prepping steps, you can suspend just about any material in resin.

In this basic tutorial I will be casting jewelry pieces with resin, but you can use resin for whatever else you would like to make like paperweights, coasters, soap dishes and many other things. There are even many different types of resin that can be used, for different types of desired uses.

I myself use a two part casting resin that is pretty user friendly. I am a novice at resin, just learning as I go and getting better each time. Its fun and I thought I would share some basic tips and give crafty divas something new to try…cause like me I know with all this creativity you have inside of you, you always want to try something new. So this is something for you gals who are aching for a new creative outlet.

I chose to cast fabric for the purpose of this tutorial. I have played with sprinkles, glitter, and candy before. So I thought I would try something new, so here goes….

resin

Supplies

  • Easy Cast Resin
  • 2 Plastic Cups
  • 2 Stir Sticks
  • Wax Paper
  • Paper Towels
  • Resin Molds
  • Fabric of choice
  • Mask
  • Gloves
  • Timer

Before hand I prepped my pieces of fabric by cutting them a little smaller than mold shape, and sealed them off with mod podge, or you can use an acrylic sealer if desired.

Instructions

    1. Take a plastic cup and pour in 1 oz. of resin, then pour in 1oz. of the hardener in the same cup, so you end up with 2 oz. total. (Easy Cast has a ratio of 1:1)

    2. Take one of the stir sticks and gently mix the concoction, make sure not to whip as it causes air bubbles. Scrape the sides periodically and mix well for 2 minutes. The mixture will look cloudy at first but this will clear up after resin and hardener are mixed together thoroughly.

    3. Take this mixture and gently pour into your other clean plastic cup. Stir gently again for 1 minute this time. The mixture at this point should be clearer than before.

    4. Set mixture aside for 5 minutes, so the resin can self-degas. Take this time to clean up a bit and get your mold and fabric piece(s) ready.

    5. When ready, pour a little bit of resin into each mold, about a quarter full.

    6. Then place cut fabric, right side down into resin. You can use a toothpick to position and press fabric. This will also help remove any air pockets trapped underneath the fabric that can caused some bubbles.

    7. Then this is where you will need to practice some patience…let the piece(s) rest overnight or for several hours until cured. You can check if it is cured with a toothpick, this way no fingerprints will be left behind.

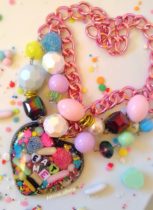
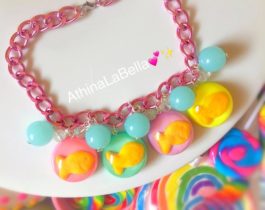
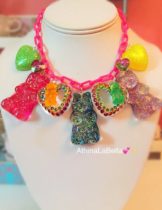
What I covered in this tutorial are the basics, but you can get more creative by adding different layers. Below are photos of some layer pieces I created, I hope you find them inspiring.

After your pendants are cured, you can jazz them up by drilling holes, adding jump rings, gluing on bails, posts, brooch settings, what ever you like, let your imagination run wild, its all up to you! Your end result will be beautiful and unique pieces.

A great source of reference and inspiration of mine is a book that I turned to when first approaching resin after multiple searches on Google, a book called “The Art of Resin Jewelry” by Sherri Haab. In this book she goes over in detail all different types of techniques with resin, like the so fun and yummy candy jewelry.

Athina’s Creations

See more in my shop here.

Originally published on 12/08/2009.

Vlog

Secret life of a New YouTuber / Vlogger Tag

12/03/2015

What are Youtube “tag” Videos?

If you’re a new vlogger on youtube you might be wondering what exactly a tagged video is (besides the obvious tags used everywhere online which explain content)… Well a tagged video is a video topic, theme or survey on Youtube where you also tag another Youtube vlogger to answer the same questions or make a similar themed video. There are ALL kinds and it’s generally good etiquette to tag another friend if you are tagged and of course to keep the tags going. I am a “bad girl” because I waited so long to upload mine due to the chaos of wedding planning and traveling.. however here it is! Feel free to tag me in videos or ask for me to tag you in upcoming ones! There are a few more coming soon as well as a camera view you asked for. So stay tuned!

Thanks to Cheyenne Jane Videos for tagging me!! I filmed this awhile ago but wasn’t able to upload it until now! Sorry for the delay~ I’m pretty new still so I’m not on my game with YouTube yet. I still love it! I have a couple of cute requested videos coming next~ stay tuned and thanks for watching! Let me know if you’d like to tag me or me to tag you in the future! I tagged Michelle Shea.

By the way this video was made when it’s late at night and my hair and eyebrows are a mess but this is honest! This is me at night after I’ve been running around like a crazy person all day! HA.

Crafts DIY Vlog

Artist Trading Cards DIY: Make and Collect

12/16/2014

Inspired by the many trading cards of the past, artist trading cards (often called ATCs) are another fun way to trade with a personal flair. I have a feeling that even non-proclaimed-artists should create ATCs — what a cool way to revive aged-pop cultures? I plan to attach bubblegum to mine so let me know if you’d like a bite~

The cards must be 2.5in by 3.5in or 64mm by 89mm (no exceptions ^^). They are also generally made as limited editions (it’s a time to relax and handmake something small and exclusive) and should probably contain your name, theme, contact information and anything else you’d like to include! If they’re part of a series you can also number them, ex. Moon Cats 3/6. It might be a cool idea to use different themes or criteria for each series to keep it fun~ challenge yourself and be creative!

Pattern

ATC envelope pattern.

Swaps & Collecting

ATCs For All Forums
Swap Bot
Altered Art Swap List
Etsy ACEOs

Crafts DIY

How to Make Citrus Peel Potpourri

12/28/2013

potpourri

Need an easy and sweet little gift for friends? Want to add some deliciously spicy scents to your environment, closets or dresser drawers? Why not make potpourri? It’s easy, comforting and smells wonderful! This year at our Holiday party I made a big bowl of potpourri in one of Mistereducated’s handmade, sparkly bowls. It was a combination of citrus peels from the fruit salad we made, dried orchids from the flowers he raises, roses from bouquets he’s given me, spices, herbs we grew and tended together, etc. It was filled with lots of love and the spirit of our happy home. I placed the bowl in the center of the table and on the edge I placed silky white sachets filled with the potpourri for guests to take upon leaving.

1. Peel orange, lemon or grapefruit trying to keep large pieces of peel.
2. Cut into peel-shaped slivers or your own shapes with sharp scissors.
3. Lay out on a tray with no peels touching each other and let dry for a few days.
4. When dry, add peels into glass jar with cloves, cinnamon sticks cut into smaller sections, nutmeg, small pinecones and dried flowers such as pink rose petals.
5. Add 3 drops cinnamon essencial oil and 3 drops orange essential oil.
6. Lid and shake jar. Keep closed for several months making sure to shake or stir each month.
7. Voila! Open and place potpourri around house in bowls, baskets or in sachets.

Citrus Stovetop Potpourri

1. Grab a pot.
2. Add fresh orange peels from 2 oranges (no need to dry).
3. Add spices of your choice: cloves, nutmeg, cinnamon, vanilla, etc.
4. Put enough water to soak and submerge ingredients.
5. Simmer on stove over low heat to achieve scents, turn stove off when done.
6. Can last a few days if you want to re-simmer tomorrow.

slice

Want to use SLICES of oranges to make potpourri?

1. Slice the orange into thin, even slices.
2. To dry in your oven, set the temperature to 100 degrees F and put in oven for approximately 4 hours. The dried slices should be brittle when removed.
* Make sure to rotate and shift the drying trays every half hour and turn the food occasionally to ensure even drying.

Crafts DIY

Art Journaling: Let’s Get Started!

10/24/2011

I really adore art journals, ATCs (artist trading cards) and decorated mail. Don’t you? I love the time and effort that goes into creating them and the mixed-media collaging that tends to take place. I’m kind of new to the scene, I have to admit, and I was never much of a scrapbooker so I figured a great creativity challenge for myself would be to start an art journal.

Why don’t you start one with me? (If you already have one start a new one, we’ll be doing more spreads in the future.)

First off, if you don’t have a journal (I needed a new one) you’ll need to get one. Composition notebooks work great and they’re inexpensive. I’m using a small Moleskin because I like to do things small-scale. If you have an old notebook lying around with some old notes that you don’t need anymore feel free to use it. You can always cover the notes with paint, marker, paper and decorations.

You’ll also need to prepare the pages beforehand with gesso, glue sticks or rubber cement and maybe some Mod Podge to paint the page with when you’re finished?

Let’s start the journal off with a self-portrait or representation of you, your name and 5 things you love (this is to inspire your decorations!). For this spread you’ll need to cut out photos of things you love either via magazines or your printer, to find patterns on scrapbook paper and fabric that you like and a colorful selection of paint/markers/pens.

first art journal attempt

My list of 5 things I love was coffee/tea, hearts, stars, unicorns and Japanese candy. I am represented as Rainbow Brite because my brother wanted to name me that when I was born. Also, my name is in Katakana because once upon a time I left my heart in Japan.

How did yours turn out? Please email it to us so I can post it here.

If you’re interested in learning more about Non-Digital Art Journaling there’s a great article to get you started here and an AMAZING ecourse I just found out about (and that I really must participate in) here — looks like a great class to get your inspiration juices flowing and to learn a lot about yourself!

Here are some gorgeous journal pages I found while surfing Flickr to get you inspired.

11-09-11a
Art journal happiness
journal 07 10 11
ICAD #22
Oslo Travel Journal_Day 3
Art Journal Page

Artist & Designer Features Design Your Life

Getting Plush With Holly Stanway

05/17/2011

Holly is a remarkable artist. She and I were friends back in the old school days of Miseducated through LiveJournal. Because of this I’ve had the privilege of watching her work blossom from something beautifully eerie into something absolutely drop-dead stunning and magical. I had to feature her both because of her A Litte Stranger creations and because of the cutie Hey Cavey which is taking the plush scene by storm.

In fact we’re so smitten by Holly’s work and by her Cavey creature that we’re planning another giveaway this month especially for Cavey’s birthday! Stay tuned for the details!

Hello, Holly! First, let me ask you what is your passion?
Creating. I love learning new crafts and ways of creating things, and i’m always looking to find a new way to do something. I love the feeling of starting out a project not really knowing how its going to loo and seeing it evolve and morph into something I can be proud of.

How long have you been making toys and plushies?
I’ve been making stuff forever, but in a professional capacity for about 8 years.

When did you decide that this was your calling?
I kind of stumbled into the plush thing by accident, I studied model making at University, and took a job prototyping toys after I graduated. I’d always done sewing and made little toys in my spare time and run a small webshop selling plushes and doll clothes while I was at Uni. We did a lot of work on action men while I worked prototyping clothes and I convinced my boss to let me do the clothes and little parachutes and stuff and it all went from there. I’ve always just kind of made opportunities, and even now I don’t really know what’s around the corner, I just take things as they come. 🙂

When did Cavey come into play?
Just over a year ago, the idea came about all of a sudden and i started making these little prototypes out of scraps. I tried him long, thin, fat, with feet, paws, a tail etc eventually deciding he looked best super simple with just a little face.

What makes Cavey special? How is he different from other characters?
The idea behind Cavey was always that he appearance of the character was very simple, and was very personality driven. I like to keep him ambiguous, Cavey is neither a boy or a girl and he’s always called Cavey to let his new owner find a name for him if they choose.

Do you have creativity blocks?
Occasionally. (but thankfully not too often :))

If you don’t mind my asking, how do you remedy your creative blocks?
I’m a bit of a workaholic so when i’m struggling to see the woods for the trees, so to speak, I try and take a bit of time out and do something completely different for a while; go for a run, go out to eat with a friend, once I’m not so deeply into something I’m usually good to go again 😀

What inspires you most?
I’d have to say animals and pets. Fantasy films have always been a big influence on me, and the magical characters in them. And anything Jim Henson.

Holly’s Creations

The Forest Sprite

Custom plush, Melek

Space Dragon

Cavey!

Redcoat

Single Tentacle necklaces

New blue sleepy monster

Finished Octopus necklace

Crafts DIY

DIY Ripped & Burned Tights Tutorial

05/03/2011

Ripped tights are pretty popular right now and it’s no wonder — they instantly add a punky, ragged feature to your look and they’re easy as pie to make! Grab a pair of tights, old or new, and follow along to achieve that ripped look.

Create Large Holes

First I used a lighter to create holes that wouldn’t run, the fire actually burns the nylon and creates a seal. For holes and rips that wont run use a lighter or stick of incense. Softly touch the fabric and the hole will become bigger. Be careful if you’re wearing your tights while you’re burning them, nylon can drip onto your skin and permanently scar!

Create Runs

To create runs in the stockings you’ll need a pair of sharp scissors. Carefully make small vertical snips and drag the scissors up against the cut to make a run. To seal runs so that they stop use a lighter or a tiny dab of clear nail polish.

DIY

Create Your Own Angelic Pretty Hoodie

03/14/2011

I saw this in Kera magazine and thought it was so cute I just had to feature it. This tutorial also teaches you to create the perfect bow which can be used for just about anything!

Have an ordinary hoodie you want to transform from boring into cute couture?
I see these hoodies all the time at department stores for inexpensive prices and wish they had a little something more, why not just DIY?

Ribbon Tip

Tie the end of your ribbon to the end of your hoodie’s string after you cut the knot off and pull through.


Crafts DIY

Let’s Make Permanent Daisy Chains

02/11/2011

Please excuse Miseducated again for looking a little curious lately, there will be lots of changes occurring over the next few weeks!

I’d love to sit outside along the water and braid delicate clover blossoms and smiling daisies.
Don’t you love daisy chains?
My daisies are gone, they’re under about a foot of snow and ice.
How will we have a relaxing and flowery day in the sunshine?
My best friend suggested we go to the craft store recently and purchase the tiny craft roses for just that purpose!
Why hadn’t I thought of it before?
A permanent daisy chain?
It’s simple!

Pick out a couple of the metal-stemmed flowers at your local craft shop.
(At our craft shop they’re in the wedding section~)
I got two bouquets of contrasting candy colors.

It’s quite easy, just twist them together similarly to the knotting you do on a real daisy chain..
When you have a chain large enough to sit atop your head twist the ends together.


Magazine Clips Visual Splendor

Japanese Magazine Clippings: Decorate Everything

08/27/2010

I’ve been meaning to update things here for quite awhile! I had an extremely long checklist and had to actually go through each and every one of our old entries.

Whew!

As you know the thing I love about Japan and modern Japanese design is that absolutely anything can be decorated and that even the most minute task is done with the utmost care.

After scanning through a collection of Japanese deco books I decided I would clip out my favorite ideas.

Are you inspired?

decos
1
2