Browsing Category

Crafts

Crafts DIY

Kawaii Crafts From Around the Web

01/10/2011


Recycle old magazines to make thrifty canvases.
Create a plush, retro deer similar to Ayumi Uyama style.

Create Hello Kitty cake pops with Bakerella.
Make a sugary sweet felt coin purse.

Merci to each of the authors for your lovely craft tutorials! I’m very happy to feature these blogs because they really excel at creating visual, eye-candy heavy tutorials and I know you Miseducated readers will love them as much as I do!

Now let’s get creating…

Crafts DIY

Make Your Own Beads Out of Sand

08/21/2010

This perfect summer craft originates from the Bahamas and other tropical places where they are blessed with beautiful sandy beaches. Die-hard jewelry makers will use just about anything to make jewelry with, even the beach itself! If you are lucky enough to live by the beach and have access to any department store or craft store, then you can make your own sand beads from scratch. It is a bit time-consuming to roll and shape all of your own beads, but its worth it in the end when you have tons of colorful beads to make all the jewelry you want!

IMG_0842

You Need

Fine sand (from the beach or from the store)
All purpose flour or papier-mâché
Elmer’s Glue
Wax paper
Vegetable oil

If you got your sand from the beach, sift it through a cheese cloth or a window screen to separate the larger grains from the fine stuff. Pour the fine sand into a bowl and mix in the flour or papier-mâché and mix it together well. You need to use equal amounts of flour and sand. Coat your hands lightly with vegetable oil so the sticky paste that you’re about to make won’t stick to your hands. Pour in your Elmer’s Glue slowly and knead it with your hands like bread dough. If it starts to harden before you’re done mixing, add more glue. If your hands get too crusty as you work, rinse your hands off and apply more oil. Also, if you are using beach sand and you want to add color, mix in some acrylic paint.

Break off pieces of the sandy dough and roll them into your beads. This is where you use your imagination to create the beads you will use for your jewelry. Make many different colors and sizes, or make a series of the same kind for a long beaded necklace. You can also make short tube-shaped beads, square ones and irregular shaped beads.

Set your beads on a piece of wax paper and let them dry overnight. Use a large sewing needle or any other sharp metal skewer (be careful!) to poke a hole through the middle of each bead. You need to do this while the beads are still slightly tacky, but not so soft that you squish the bead. Let them dry all the way.

Coat them with clear acrylic varnish to make them glossy and protect them, if you want. Now you can make your homemade jewelry for yourself and your loved ones!

IMG_0844

More Ideas

Substitute half of the sand (or less) with fine glitter to make sparkly beads.
Swirl different colors of the sandy dough together to make multi-colored beads.
Make beading kits with your left-over sand beads and give these kits away as gifts.
Add other natural beads like shells and tiny pieces of drift wood to make a real beachy necklace.
Sell your sand bead jewelry to people at the beach.

Crafts DIY

Let’s Start Digital Scrapbooking

07/05/2010

Because I’ve never actually made myself finish a digital scrapbook page this feature gave me a reason to pick up the hobby as well! Why digital? It’s much easier if your photos are digital, you can scan and photograph favorite patterns AND you don’t have to keep a big box of paper and glue handy for scrapbooking~ this is especially important for minimal me.

Colette Month 1
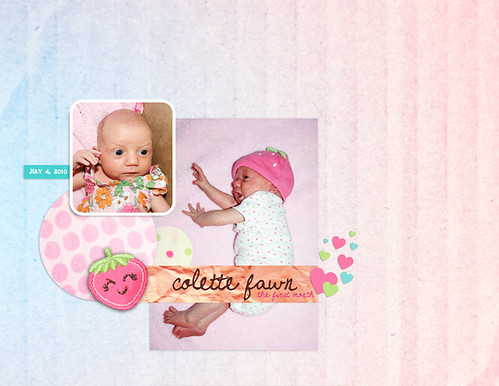
My first digital scrapbooking attempt.

What do you need to get started with digital scrapbooking?

A bunch of patterned paper to scan or a collection (think of a theme!) of digital scrapbooking materials.
A digital camera, scanner or collection of scanned photos.
A photo editing program.
Creativity and patience.

538295_1000x1000 147591_1000x1000

Which photo editing program should you choose?
Are you a beginner or have you had experience with more challenging programs? If you are a beginner, you may want to purchase a first-time user friendly program such as Adobe Elements or Corel Paint Shop Pro. If you have more experience with more challenging graphics programs, you may want to invest money in a professional program like Adobe Photoshop.

How hard is digital scrapbooking?

It’s not hard at all! With a few design elements and a graphic design program just about anyone can throw together a scrapbook page, even a child. Don’t let it scare you away, it’s easy, entertaining and fun!

Digital Scrapbooking Materials

Kitschy Digitals
Two Peas in a Bucket
Jessica Sprague
Pugly Pixel Freebies
Designer Digitals
DigiScrap Boutique
Scrap Girls
Free Digital Scrapbooking

Your Style

In creating a digital layout from scratch, there are the same basic steps: add background paper, add photos, create photo mats or accent papers, add embellishments (if desired), and finish with text. You can use these steps to create your own personal style, whether it’s clean and streamlined like a magazine layout or contains drop-shadows and a more traditional paper feel. With digital scrapbooking there are about a million ways to go and it’s all up to you to define your own personal style!

543364_600x600
by Nicole LeBlanc

Methods

Instant-Page
You can download or purchase a pre-made layout template for easy scrapbooking. This is a great way to begin if you’d like to learn the ropes and get used to the techniques. Simply add your photos and text for instant pages.

Build it Yourself
Once you’re ready to start designing your own pages using your own embellishments or downloaded embellishments you can follow this tutorial:

438591_600x600
by Jennifer Johner

The Makings of a Digital Layout

The following is an outline of the steps needed to create a basic digital layout from scratch. Don’t get overwhelmed, it’s quite easy to follow along with your own design program.

Create a New (Blank) Image
Determine the size of the layout you would like, such as 8.5” x 11”.
180-225 dpi is a good resolution for inkjet printers; 300 dpi is professional quality.
Enter the settings in your software’s new image dialog box, including a white background, then press OK.
At this point, and frequently throughout the design process, save your layout as a TIF so all the layers remain intact and you can go back and make changes to individual layers whenever you wish. Choose File > Save As and then save as a TIF.

Add Photos
To add a photo to a layout, browse your file system to find photos or drag them into your program (Mac).
Click and drag photos into the layout or use the edit/copy and edit/paste commands to paste them into your new layout.
Move and resize the photos as you desire, there’s no glue involved so you can always change your mind later!

Create Background
Use a paint-fill, pattern or downloaded background.
Creating your own is just as easy as photographing a favorite blanket or piece of paper.

Add Text
Using your text tool, pick the text color, font, and font size. Then click the mouse on the page where your text should be placed and type away. Try different sizes, colors and effects for differentiation between text elements — such as journaling and dates!

Add Ready-made Embellishments
For a punch of detail and splash of color, you can add ready-made embellishments (visit the sites above to download some!) that can be dragged onto your layouts.
While your layout is open, choose File > Open and browse your hard-drive for which embellishment(s) you’d like to add, open them, and then drag them into your layout. You can change their rotation, color, and size, if desired.

Save File for Printing and/or Web Display
Save the final image as a TIF — for a high-resolution print you can print from this file.
If saving to print elsewhere, save as a full-size PDF or JPG file.
To make your file ready for web, save as72 dpi, about 500-600 pixels wide and as JPG.

That’s just a bit of information to get you started, hopefully this sends you into a frenzy of creating your own scrapbook pages digitally. For more help with your graphic program view the instruction manual or search the web for more tutorials. There are many great scrapbooking blogs and forums for you to play around on and get more inspiration~ go explore the world wide wonderland!

Our own Wendy Rose tried her hand at scrapbooking as well and found a new delightful hobby to share.

Strawberries
by Wendy Rose
Crafts DIY

Make a Tiny Fawn For Your Flower Pot

05/07/2010

This craft features pictures from Martha Stewart Living — it’s a simple and cute craft for kids. I absolutely love fawns and deer, it just so happens I’ve been lucky enough to live in a place as a child where they often came into our yard to visit.

So how about a few little fawns to top your indoor flower pot soil? Or strewn around your desk? On a cupcake? The possibilities are endless!

All you need are a couple of brown pipe cleaners, a section of a tan pipe cleaner and tiny white spots — just glue on tiny sections of white fabric or ribbon.

Also, you must send all photos of these if you made them for any purpose so I can display them here!

fawn

Crafts DIY

Blythe Clothing Pattern Collection

04/15/2010

One of the best things about Blythe is she’s just the right size to whip up an adorable outfit for in a couple of hours (or less!) .. and she looks adorable in anything!

Blythe is known as a model among the community and a creative inspiration. Some of my favorite outfits were handmade painstakingly with a cute photo in mind — yet another creative way to spend your free time.
berrycloth

Sewing Patterns

Puchimadam
XOXO Blythe
Jam Fancy (new)
Jam Fancy (old)
Tshirt

Knit Patterns

Wooly Rockers
knitty

Crochet Patterns

Suncatcher Eyes

.. and remember we have a pattern here as well you should try!

Crafts DIY

Customizing Blythe: How to Paint Lips Like a Pro

04/15/2010

Hello! I customize blythe dolls for both fun and for some profits. So far I have been doing it for just a little over year. I started when I was 15 and my first doll was quite terrible (as I wasn’t very careful), but I got better and better with every doll,and have now done 20+ dolls. So here is a tutorial for re-coloring or customizing the lips of a Blythe doll, hope you like it!

blythe lip tutorial

Step 1

Gather your supplies: Blythe, fine-grit sanding sponge, a small flat paint-brush and a bigger softer paint-brush, chalk pastels in a lighter and darker color, and watercolor-pencils in a darker color and white.

Step 2

Sand off the original lip color (you may have to scrape the paint in the crease away with a some-what dull x-acto knife). With the small paint-brush, brush the darker pastel color in the crease of the lips and lightly outward.

Step 3

Use the darker watercolor-pencil to define the crease and add some lip wrinkles.

Step 4

Use the white watercolor-pencil to add texture with quick strokes, and lightly color with it to blend with the darker color.

Step 5

Brush the lighter color pastel on with the bigger paintbrush and you’re done!

… and it make take a few tries to get it right, so don’t get frustrated! 😉

blythe

Crafts DIY

Make a Flower Accessory with a Hawaiian Lei

03/30/2010

Feeling crafty? Are you not sure what to do with the Hawaiian lei that you’ve had for years but, its so pretty you don’t want to get rid of it? Make a cute accessory with it! Its fun, easy and you only need a few materials…

featsm

You Need

Fabric Hawaiian Lei
Scissors
Needle
Thread
Clear nail polish
Hot glue gun

Get a container to put all of your loose flowers in and cut the string of the lei. Keep them so you can make more later, because your friends will probably want one too. Pick out about five or six loose flowers and a leaf (if your lei has them) if you want to incorporate it.

Stack the loose flowers on top of eachother, with the leaf at the bottom. Try to stagger the petals so that they aren’t perfectly lined up (like in the picture) and slip one or two pins through to hold them together while you work.

Run a few small stitches through the middle of the flower. You don’t need to do very many, just make sure its secure and the thread won’t come loose. Try to make sure your thread is the same or, close to the same color as the fabric so it stays invisible. If you have to use a different color (like I did) it won’t be too bad, just try to stay close to the center.

Now you can make your flower look more three-dimensional, like a rose or a peony. If you like the flat look, you can skip this step. Starting with the petals on top, fold one side over and run a few small stitches close to the center. Work your way around on different layers, repeating this step until your flower has the shape that you want.

Swipe a little clear nail polish along the edges of the petals so that they don’t fray any more than they may have already. You can also use your scissors to trim any strays.

Now you can attach your flower to… pretty much anything! Use a hot glue gun or your trusty needle and thread to tack it onto a pin, barrette or head band. You can also attach it to a hair tie or wear it around your wrist like a corsage. Decorate a plain hand bag with colorful fabric flowers!

More Ideas

Run some fabric glitter around the edges of the petals, or make “rain drops” in random spots.
Attach a button, pretty bead or cabochon to the middle.
Hot glue some some crystal rhinestones on the petals to create the “rain drops”.
Add other embellishments to the bottom of the flower like ribbons or lace.

If you make one, feel free to post it in the comments!

Crafts DIY

How to Hello Kitty Crochet

03/03/2010

Crocheting is quite a fun and addictive hobby, unlike knitting it seems like the sape possibilities and graphics are endless, it’s just perfect for crafting little plushes (amigurumi) and graphic designs.

I’ve become addicted to both knitting and crochet living in cold, cold Indianapolis and even more so now with a baby on the way. I can’t imagine all the rainbow kitty afgan cuteness that will erupt!

So how do you do it? Not sure where these notes originated from, possibly Craftster, but they’re quite useful for new cute-crochet lovers!

Such a beginner you still can’t get it? A great way to learn crocheting and knitting skills is to watch tutorials online, you can pause and take as long as you want.

What is a Single Crochet, Half Double Crochet, Triple Crochet, Chain Stitch and Double Crochet ?

tut Hello Kitty crochet mix

The Hello Kitty pattern is quite elusive, it takes a bit of a search to find it. The book is out of print, hard to find and expensive. If we simply learn to crochet Hello Kitty to scale and the rest of the granny square the possibilities are endless! They seem to attach the white head to quite a lot of the projects, so this is absolutely necessary to learn for any crochet kittiness.

Crafts DIY

How to Repair a Dress with Heart

02/26/2010

So, you were lounging around in a comfy dress and ran right into your incense? You went out dancing and your best friends cigarette went missing for a second? It happens!

Luckily there are always cute ways to snazz up a boring dress or to repair a fallen dress. Mine is a lounge dress I got for my pregnant-belly, but you could use any number of dresses.

A simple method, and the one shown in the tutorial here, is to cut shapes out of a contrasting color iron-on-patch and iron it on.

repair

Other great replacements would be pompons, sequins, embroidery, cute beads or handmade patches! Make your own patch by cutting favorite designs out of tshirts or painting a blank iron-on patch. The possibilities are endless if you have the creativity. I can’t wait to see how you use this method!

Crafts DIY

Living Art: How To Make a Terrarium

01/22/2010

Terrariums are magical miniature pieces of nature that you can admire anywhere in your home. They are living pieces of art. You don’t even need to be a master gardener (I certainly am not) to put together and care for your own terrarium or dish garden, but you do need to know a few things about what kinds of plants need how much light and watering. Designing your own terrarium allows to you get creative and let your imagination run wild. You can include miniature statues of mythical creatures, little signs and pretty rocks. If you can’t find what you want, you can even make little mushrooms or animals out of oven bake clay.

Terrariums are enclosed, so the plants need to be small enough to grow inside of a glass jar, a small glass box or any clear container. Wide-mouthed glass containers with a removable lid are the easiest to work with because you have easy access to water and prune as you need to. You can even mount your terrarium on the wall in a light box or hang it from the ceiling in a glass globe. It all depends on your imagination and the things you can find. People have even made tiny terrariums inside old light bulbs!

970065_020_b 970065_020_f
Tabletop Terrariums at Athopologie

You Need

A container
A group of small plant starters that will grow under the same amount
of light and watering.
Some sand or small pebbles
Activated charcoal
Spaghnum moss
Potting soil

You should plan out how you want it to look before you start collecting your supplies–make a sketch or just have a vivid image in your head. The first thing you will place in your container is a layer of coarse sand or small pebbles that is about one inch thick. This layer is for drainage and will keep your plants’ roots from rotting.

Next you will need to lay on a thin layer of activated charcoal–the same kind they use in aquarium filters to keep the air flow or water flow clean, so you can find this at the pet store. If you are planting in an open-air container you won’t need this.

Lay down your Spaghnum moss in a thin layer so that your soil won’t sink down into the charcoal and pebbles every time you water it.

Now you can add your soil. You can buy pre-mixed terrarium soil blends or you can just mix 2 parts regular potting soil, 1 part coarse builders sand (never use beach sand) and 1 part leaf mold (aka humus). You don’t need to add fertilizer because you don’t want the plants to grow very large and there is already a substantial amount in the potting soil.

Sometimes all your little plants require for watering is a good misting from a spray bottle to emulate rain. You should never place your terrarium in direct sunlight.

If you want to make a desert-themed cactus garden, this would be much easier to do in a dish rather than a terrarium. Since cacti and succulents need drier, sandy soil, you can use special potting soil
made for them or put your potting soil down and then place an equal layer of coarse sand on top after you plant your cacti. You don’t need spaghnum moss, charcoal or pebbles for a desert garden, but if you are using a planter dish with a hole at the bottom, be sure to put a small piece of screen over it so your sand doesn’t fall out. Also, unlike a terrarium, your cacti will need plenty of direct sunlight. Wear thick gardening gloves if you are working with sharp cacti!

Your cacti will only need to be watered about once a month. Always make sure you water your plants with luke warm water instead of cold water so you don’t shock the roots. Image someone throwing ice cold water on you on a hot day!

I hope I’ve sparked your interest for making your own terrarium! They make great little decorations and interesting gifts. Here is a list of a few small plants that would be good for a terrarium or dish garden but this definitely isn’t all of them. Do some research on the care of the plants that you want to use and let your imagination run wild as you plan out the look of your mini garden.

Irish Moss

Great for any tiny landscape and only grows to a max of three inches tall.

Miniature Peperomia

Stays small and and has tiny round leaves. Very easy to maintain.

Wintergreen

Grows to about six inches tall and is very hearty. Blooms tiny white flowers in the summer and smells minty.

Dwarf Japanese Sweet Flag

Tiny ornamental grass that resembles an Iris plant, but only grows to two inches tall.

Leptinellas

Looks exactly like an itty bitty fern and are often refered to as “mini ferns”. These are also easy to take care of.

Butterwort

Cool little carnivorous plant that attracts insects like a living fly paper and dissolves them with digestive juices on its leaves. Only grows to about one inch tall with sticky leaves but will bloom a pretty purple flower.

Mini Bonsai

Would be a cool addition to a dish garden but would be hard to maintain in a closed container because they need to be trimmed and trained into the bonsai shape.

Earth star AKA Starfish Plant

It stays under six inches tall and grows a rosetted star shape of long, spiked leaves. It is easy to care for and is perfectly suited for a terrarium because it loves humity.

Succulents

Cacti and other succulents like Aloe Vera and Jade grow very slowly and will eventually outgrow whatever container you put them in. Plant them when they are small and you’ll be able to enjoy your mini desert garden for quite a while.