Browsing Tag

japan fashion

Self Decoration

Fairy-Kei and More Japanese 80s Revival Fashion

04/22/2010

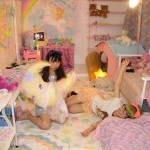
One of the reasons I love this style so much is because it looks exactly like my world as a little girl. I wish I could raid my closet and room from then so I could create my own little fairy-kei world again. I’ve realized this is exactly what I’m doing with Colette’s clothes and decor.. she’s getting all those adorable goodies I kept safe! Popples, Baby Brite, Avon character jewelry and more.

I guess I’m probably a big fan of decora too? Seems to be a bit of a difference in color hues with both styles of fashion. I’ve been a long-time lover of decora and that’s because it’s bright and tasty (think Barbie hot pink and an overload of rainbow accessories).

So let’s take a look at what makes fairy-kei special and what makes it different from decora…

fairykei

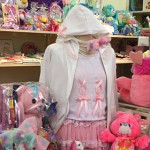
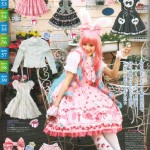
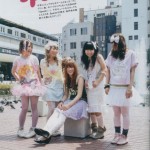
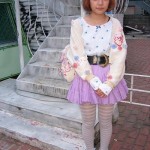
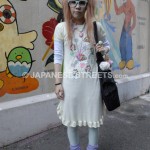
Fairy-kei is a candy-coated, marshmallow rainbow-covered delicious arrival in Japanese fashion. As Miseducated and SPANK! often do, it features the cute characters and motifs of the 80s: My Little Pony, Care Bears, Popples, Barbie, etc. The palettes favored seem to be all soft, light hues of the 80s marshmallow rainbow. Fairy-kei uses as many as 6 colors in an outfit, but don’t be too hasty with color — make sure that each of the colors balance each other out. Colors you use should be used at least one other time in the outfit, usually, to add icing on the cake and to tie it all together. Think bows, beads, accessories and pompoms!

photo-1
Photos are thanks to scans and the lovely places below.

All Dressed Up

Made In Girl Magazine
Tokyo Fashion
Niles Perch
SPANK!
Pop-Kei Community
La Carmina
Asia’s Vintage Clothing Explosion
Hello Reimei
Fairy-Kei Community
Drop Dead Kawaii aka Petsugar

Fairy-Kei Tips

If you’re an 80s kid, ransack through any old stuff you kept or stored and see what treasures you can find! It’s like new but has more meaning attached. If you can’t find any try ebay, flea markets and thrift stores for marshmallow rainbow 80s goods.
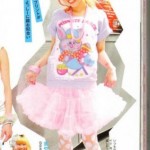
Tutus! They’re easy to find these days and very easy to make. You can make your tutu as simple or as decadent as you like; they’re all sweet when paired with a tee.
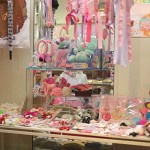
Pompons, bows, tulle — all in the marshmallow rainbow of fairy-kei — think of making yarn into large pompons for hair and keychains, smaller ones for other accessories.
Found some cute 80s fabric but the item is shot? Patch it onto a tee, add some glitter. Don’t wait for your favorite new t-shirt, make it!
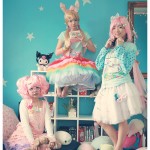
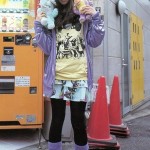
A big pastel sweater with an alternating color of hair bow. Think big and ridiculously cute! Keep it simple if you like with a black tutu and flats, you can be Fairy-kei inspired without going over the top.

Self Decoration

Let’s go to the Nail Salon!

10/17/2009

Imagine your fingernails sparkling when they are typing on the keyboard or flipping the pages of a book! Pretty fingernails really make one feel very happy! Think Sanrio, “Small gift, big smile.” In times like these it’s the sweet, inspired things that really go a long way.

So let’s go on a trip to the nail salon I frequent in Hong Kong! I’m planning to get some gel nails with 3D acrylic nail art and Swarovski crystals.

w204195455
w172453071

Amazingly the nail painter accomplished my rough sketches to wonderful gel nails!

I found the patterns in some Japanese nail art magazines which the nail salons provided.

But if those magazines can not satisfy your crazy thought about nail art, it is surely more fun to design your own cute nail tips! Miseducated girls are all about inspired lives and diy — I’m sure you have many ideas to use.

You can change your nails in honor of a holiday or occasion; how about a Christmas version with snowman and Christmas tree?

Just draw whatever you would like on your nails and simply write some descriptions about the colours and what kind of stone you prefer.

Use the ideas in magazines as an inspiration, but most importantly, have fun and create whatever you like!

Crafts DIY

Create your own Nail Art

10/13/2009

Fingernails.. Toenails.. they’re like mini canvases waiting to be painted (or collaged!). I used to have such a love for nail art that I devoted an entire website to it, complete with fanlisting! The fanlist grew large, the discussion about Japanese fashion, makeup and nail art was booming.

Now thanks to the rad Japanese fashion magazines people scan and share and Gwen Stefani, Japan fashion is even more prevalent today. (yay!)

Japan has a hand up in life design.
Design is a process that we can take to every level.
Let’s not ignore our nails! 😉

So how will we get this decadent inspiration without scanning bookstores for Japanese fashion magazines and nail salon listings? Here of course!

Below are some cute nail tips and tutorials from Japan, I’m absolutely digging on the strawberries.

No matter what you decide~ enjoy life to the fullest while you design your world.

Nail art scans are from Japanese fashion magazines such as ecocolo, CUTiE, CUTiE Book, melon, egg, Kera, BLENDA, JILLE, ku:nel, Nail Up, etc and, my favorite nail salon, PinkyNail.

Self Decoration

Trendspotting Street Fashion in Seoul

07/21/2009

I’m a Seoul lover. I love the flashing neon lights, the festive nightlife spirit, the glossy black Asian hair and the noteworthy combinations of layered clothing adorning every person’s body. Seoul, South Korea, is a fashion mega-center, chock full of flow-y summer dresses, flashy jeans, oversized bags, chic ensembles and a hefty supply of non-prescription glasses added to make an outfit complete.

It’s a place where you can wear whatever your heart desires and only be viewed as that much cooler (so long as it’s not dowdy slacks and mustard-stained tee’s, of course). You can wear 3-inch stiletto’s with cut off sweat pants and look fashion-savvy. Or, you can throw on a rainbow-colored skirt over a pair of lime green jeans and top it off with magenta leggings. And if you’re into sophisticated chic, there’s nothing wrong with a solid dress and sunglasses that take up half your face.

The fashion possibilities are endless in Seoul. Here’s a taste to get your mouth watering. Caution: Devour slowly.

Crafts DIY

How to Create the Perfect Polymer Macarons

03/25/2009

I believe many girls love macarons. Tell me who can resist the delicious and cute looking French macaron?

macaron diy

Besides the edible macaron, macaron accessories are also very popular in Japan and all around the world. There are may ways to make macaron accessories for yourself or for your little Blythe. The simplest way is to use air dry clay or polymer clay. In this tutorial, I choose to use air dry clay because I don’t like to use polymer clay that has to be cured in the oven.

macaron diy

You Need

Acrylic paint (any colour you prefer)
Clay cutter and measurement spoon (size is up to you)
9-pin
Embedded crystals (any colour you prefer)
Vaseline Petroleum Jelly or hand lotion
Air dry clay (you can use polymer clay which needed heat up in oven to cure)

Steps

1. Apply the Vaseline (or hand lotion) on the tools and surface that will contact with the clay. This step is important to avoid the clay stick at the tools or surface.
2. Apply the Vaseline on the surface and your hands too.
3. Cut this amount of clay (enough to make two macarons).
4. Put a little red acrylic paint on top of the clay (I chose red because I want to make a pink macaron).
5. Twist and rub the clay until the colours mixed evenly with the clay.
6. Then put the measurement spoon on top of the clay.
7. Press down so to get a shape alike the shape of the measurement spoon
8. Please see if it looks like the photograph above.
9 Then use any flat surface to press it down until it looks like this.
10. Repeat the step 6 to 9 for the bottom piece. Some embedded crystals are put on top of the top piece.
11. As shown in this picture.
12. Cut this amount of clay.
13. Put a little bit dark brown acrylic paint on top of the clay (to add some colour to the filling) then twist and rub the clay until the colour mixed evenly with the clay.
14. Then use any flat surface to press it down until it looks like this.
15. Sandwich the white clay in between the top and bottom pieces of pink macaron.
16. If you want to make accessories with it, you have to add a 9-pin. Enter the 9-pin from the side.
17. Set aside the clay macaron for two days for completely air dry.

Tips

1. I recommend you to trim your nails first before handling the clay, because clay tends to stick to long nails.
2. Make sure all the tools and surface are dust free to avoid any dust twisted or rubbed into the clay.
3. In case the clay become dry, add a few drop of water to get back the flexible feeling.