Browsing Tag

handmade

Crafts DIY

Create an Owl to be your Pal

09/24/2009

So you want to create a ‘fuggly’ owl to be your pal? Though yours doesn’t have to be fuggly, that’s just the way I sew! (hehe)

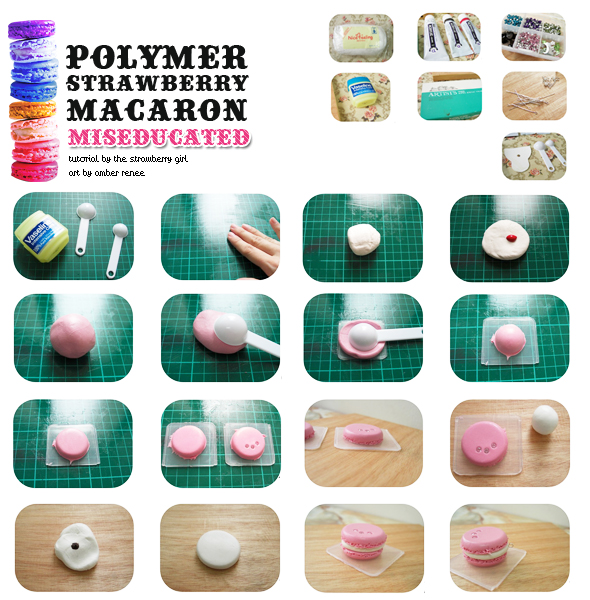
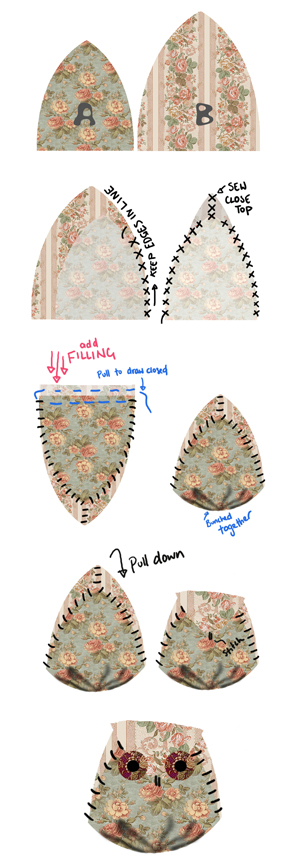
1. Cut out two triangles (one small one, one bigger one) with slightly curved edges as seen.

note: it’s not an exact science, so you may like to experiment with longer, shorter, wider, thinner, curvier triangles.

2. Face the fabric inwards and sew up one side. As you sew, pull the two fabric edges so that they are together. There will be a gap where the ‘A’ triangle ends. Continue sewing up along the side of B triangle, then back down along the other side.

3. Sew around the bottom opening so that you can pull on the thread and draw the bottom closed like a drawstring bag. Fill it with filling and pull the bottom closed.

note: I use grain but wool or polyester stuffing is also good. Do not fill it up too much!

4. Fold the top down and secure it. This makes the beak.

note: This is why you don’t want to fill it too much because you wont be able to pull the beak far down, though some people like very small beaks. If so then fill it up lots!

5. Add eyes.

note: Beads work well. Fabric has a tendency to fray when cut too small. Don’t learn this the hard way!

Business Features DIY

Toiluxe: Make Your Toilet Lux

09/17/2009

It started with a simple dilemma:

What kind of gift do I give the girl who has everything?

I myself was one of those girls, so I knew what it would feel like to be on the receiving end of another kitschy collectible, retro design coffee table book, funky framed Jesus picture… I loved each and every item, but I was at the point where there was nowhere to PUT anything, and I was not organized or patient enough to deal with seasonally switching things up. I couldn’t bring myself to pack away older items to make space for newer ones, because I had a sentimental attachment to each and every one. They all defined me, defined my lifestyle, defined how I felt when I woke up in the morning. In fact, the only room that reflected who I was the LEAST, was my bathroom, which was fine, because how much time do I spend in there anyway?

Wait a second…

The bathroom…

I went to Home Depot. After much wandering around, lost among contractors and home-improvement-ers, I found it – the wall of toilet seats. The aisle seemed to glow as if I had found the pot of gold at the end of the rainbow. As if I had discovered the meaning of life, or who was buried in Al Capone’s tomb…

It was perfect.

And everything just took off from there.


Making art out of toilet seats is not a quick-fix type of project. It involves sanding, priming, painting, cutting, pasting, gluing, detailing, and SO MUCH WAITING. Every step involves the need for something to dry – whether it be paint, modge-podge, or acrylic resin. I had to learn how to pace myself (my mother always used to say, “You want everything to happen yesterday!”) and it’s true. But I finally discovered my ideal working environment – my living room (at this point I’d like to thank my husband for his unrelenting patience.) I’d work on two seats at a time – switching back and forth while one was in a drying stage – and the television would be tuned to a campy, cheesy horror movie. The only explanation I can come up with for that is that these particular movies are terrible enough where if I was in a working stage (painting, decoupaging, detailing) and my attention was elsewhere, I could easily tear my attention away from the television and not worry that I was missing some crucial element to the story, yet the movies were also amusing enough that they kept me occupied during any drying stages (which could take anywhere from 10 to 25 minutes.)

I have since changed our home office into a small studio (again, thank you, dear husband, for being supportive enough to my craft for agreeing to move your half of the office elsewhere, and for bringing home the 300 pound cabinet you had at work for me to store my seats in a small warehouse environment.) I’ve been fortunate enough to be able to show my work at Boston’s Bazaare Bizarre and Somerville’s ArtBeat in Davis Square. 75% of my business is from custom orders which has allowed me to step out of my comfort zone and create designs I never would have thought of. The Toiluxe Nude Collection started via a request from my landlord, for which I will forever be grateful.
My creation process is constant – I live, breathe and dream toilet seats. If I could eat toilet seats, I would probably consider it. Toiluxe has been the most satisfying creative outlet I have had in a long time. To be able to create and touch a piece of art – a piece of art that also provides total functionality – has an entirely different sense of satisfaction from the computer-based graphic design I have always done in the past.

I love what I create. My goal is to bring joy to bathrooms across America, and even beyond.

DIY Recipes

Cat and Kitten Recipes for Tea and More

08/20/2009

Worried about kitty’s food allergies? ASPCA has the word on those. Make sure you don’t use any ingredients that will harm your krazee kitty!

If you’re having a kitty party and having all the kitties in your neighborhood over, don’t. Kitties prefer having tea parties with their own families and are very territorial, especially when catnip and tuna are involved!

Kitty’s Cookies

1 cup of all-purpose flour
1/4 cup of whole wheat flour
2 tablespoons of wheat germ
2-4 tablespoons of catnip
1/3 cup of water
1/3 cup goat milk
2 tablespoons of vegetable oil
1 tablespoon of molasses
1 egg

Begin by pre-heating the oven to 350*F.
Combine the dry ingredients in a bowl (flour, wheat germ and catnip).
Combine the wet ingredients in a bowl (egg, milk, vegetable oil, and molasses.
Mix the wet and dry ingredients together and work it into a dough
Lightly flour the counter or other work surface
Remove a portion of dough and use a rolling pin to uniformly flatten the dough to a thickness between 1/8 of an inch and 1/4 of an inch.
Cut the dough into 1-inch squares using a rolling pizza cutter or a cookie cutter of your choice.
Place the cookies on a lightly greased cookie sheet.
Bake the cookies for 10 to 15 minutes, or until the cookies are crisp and lightly browned.
This recipe will make approximately 50 medium-sized cat treats.

Once the treats have cooled, gently remove them and place the cookies into several small freezer bags.

Tuna Surprise Kitty Bonbons

1 cup whole wheat flour
1/2 can tuna, in oil or 1/2 cup cooked chicken, chopped into small pieces
1 tablespoon vegetable or cod liver oil
1 egg, beaten
1/4 cup water

In large bowl, mash the tuna (or chicken). Add the flour, mixing well. Stir in the water, oil and egg, mixing well. Mixture will be sticky.
Shape mixture into 1/2-inch sized balls. Place on greased baking sheets. Press balls to flatten.

Bake at 350*F (175*C) for 10 minutes. Remove treats from oven; let sit 5 minutes and then turn treats over and bake another 10 minutes or until golden brown. Cool completely on wire rack. Store in an air tight container in refrigerator.

Tuna Pops

Drain liquid from tuna packed in spring water. Freeze liquid in small ice cube trays (cocktail ice cube trays work nicely, fish shaped from IKEA trays? double points!). Give no more than 2 cubes at 1 time as a treat. Reuse your can of drained tuna by placing in it an airtight container and covering with filtered water overnight for a second batch of tuna-pop water.

Catnip Tea

tea ball loaded with catnip
1 cup Water

Put the catnip in a bottle, pour in the water. Put the cap on the bottle,and shake until the catnip tea is green.

Preserving your Cooked Treats

Since these treats are preservative-free, they will not last forever. So to extend their lives, store them inside the freezer in several small freezer bags. As needed remove a bag from the freezer and leave it out for several hours to thaw. Once the treats are thawed, transfer into a Tupperware container for easy access and store the treats inside the refrigerator for up to two weeks.

Crafts DIY

Knot Your Own Fortune Coins Necklace

03/25/2009

Hi, my name is Amanda Yu, I am the owner and designer of ”Exotic Flavour” the colorful, playful and creative jewelry design. I am grateful that I had been invited by Miseducated to prepare this DIY story for you. I hope you will like it. I will show you how to make this Fortune Coins Pink Necklace.

fortune necklace

Instructions

1. The material is very simple, prepare a Pink cotton cord (length: 155cm and thick: 3mm) and Sex piece of the round wood ornament with a hole in the middle.
2. Put on one wood ornament and make a knot. This is a part of the clasp.
3. Coil two small circles, hold tight with your left thump.
4. Round the third circle between the first two circles, pull the cord generally.
5. Put another wood ornament and repeat (3.) and (4.) until you have five patterns.
6. In the end of the cord I made an oriental cross knot and tight it nicely.
7. If you think it is complicated, you can make any knots you like. Just make sure the little circle is not too big for the wood ornament – other part of the clasp. (1)
8. The Fortune Coins Pink Necklace is now finished.

I hope you find this is inspiring. You can combine with different materials or perhaps develop another construction from this basic oriental knot. Here are two other creation I made earlier based on the same techniques.

Crafts DIY

How to Create the Perfect Polymer Macarons

03/25/2009

I believe many girls love macarons. Tell me who can resist the delicious and cute looking French macaron?

macaron diy

Besides the edible macaron, macaron accessories are also very popular in Japan and all around the world. There are may ways to make macaron accessories for yourself or for your little Blythe. The simplest way is to use air dry clay or polymer clay. In this tutorial, I choose to use air dry clay because I don’t like to use polymer clay that has to be cured in the oven.

macaron diy

You Need

Acrylic paint (any colour you prefer)
Clay cutter and measurement spoon (size is up to you)
9-pin
Embedded crystals (any colour you prefer)
Vaseline Petroleum Jelly or hand lotion
Air dry clay (you can use polymer clay which needed heat up in oven to cure)

Steps

1. Apply the Vaseline (or hand lotion) on the tools and surface that will contact with the clay. This step is important to avoid the clay stick at the tools or surface.
2. Apply the Vaseline on the surface and your hands too.
3. Cut this amount of clay (enough to make two macarons).
4. Put a little red acrylic paint on top of the clay (I chose red because I want to make a pink macaron).
5. Twist and rub the clay until the colours mixed evenly with the clay.
6. Then put the measurement spoon on top of the clay.
7. Press down so to get a shape alike the shape of the measurement spoon
8. Please see if it looks like the photograph above.
9 Then use any flat surface to press it down until it looks like this.
10. Repeat the step 6 to 9 for the bottom piece. Some embedded crystals are put on top of the top piece.
11. As shown in this picture.
12. Cut this amount of clay.
13. Put a little bit dark brown acrylic paint on top of the clay (to add some colour to the filling) then twist and rub the clay until the colour mixed evenly with the clay.
14. Then use any flat surface to press it down until it looks like this.
15. Sandwich the white clay in between the top and bottom pieces of pink macaron.
16. If you want to make accessories with it, you have to add a 9-pin. Enter the 9-pin from the side.
17. Set aside the clay macaron for two days for completely air dry.

Tips

1. I recommend you to trim your nails first before handling the clay, because clay tends to stick to long nails.
2. Make sure all the tools and surface are dust free to avoid any dust twisted or rubbed into the clay.
3. In case the clay become dry, add a few drop of water to get back the flexible feeling.

Crafts DIY

Inexpensive Do-It-Yourself Gifts

03/09/2009

This whole economic downturn has left a lot of the country in a sorry mess, but I’m not here to wallow in financial troubles. No way! I view the scarcity of cash as a wonderful excuse to get crafty! And it’s always more fun to craft for someone else which is what inspired me to create this article.

These gifts are easy to make and inexpensive, to boot! You can make them for a loved one “just because” or give it away for a special holiday. The choice is yours.

diy gifts

Hearty Bread and Jam

For you domestic creatures out there, put your skills to use! Everyone loves an edible gift, especially if it’s made by you! Jam/Jelly is a very easy item to make, it just takes a little bit longer than some foods. Bread and jam come in a variety of forms, so choose the best one for your recipient.

Cozy Blanket

Blankets are also very customizable, making them an ideal gift for any time of the year. Try these different types of blankets:

Crocheted – Choose your recipients favorite colors and have at it! They’ll be thrilled with the amount of time and effort you put into their present.

Tied – Buy two different types of fabric that complement each other. Make sure that you get a big enough size that it serves as a blanket. Both fabrics should be the same size. Next, spread the two fabrics on the floor (one on top of another) and cut around the edge. Each cut should be 2-4 inches deep. Next, tie the two fabrics together (double knot). Do this all around the edge of the blankets. Viola!

Customize – (an already made blanket) One of my favorite gifts from a friend was a blanket that she bought inexpensively and did stitch work on. It was thoughtful and unique!

Quilt – You don’t need to necessarily buy quilt material, but you can if you want. Choose several types of fabric that you like and cut them into squares all the same size. Next, sew them all together. Buy another piece of fabric and sew it onto the quilted part of the blanket.

Lovely Soap

I come from a very large family and some of my fondest memories are from the holidays when we would all work together to make presents for extended family members. One of my favorite things to make and give away was soap and other DIY beauty gifts.

The great thing about soap is that it’s practical and customizable. This is an easy soap recipe. (You can make your own from scratch with this recipe from www.thefarm.org) Here’s what you need — You can find all these items at your local craft store.

– Soap Block (available at your local craftstore)
– Soap Molds
– Scented oils (your choice)
– Other items for your soap (eg. Lavender, oatmeal, almonds, cinnamon, chocolate, etc.)

There are step by step instructions on the soap blocks and it’s very difficult to mess up. Melt your soap blocks, add scents and ingredients of your choice and let it sit in greased soap molds until hardened. Remove and place in pretty packages or gift baskets!

* Also get some wonderful ideas for soap from this Miseducated article.

Scrumptious Chocolate Covered Strawberries

First, buy about 5-15 healthy-looking strawberries. When you get home, make sure there aren’t any bad spots (if there are simply cut them away). Choose the prettiest ones and keep the green leaves on top – they look more beautiful that way.

While you’re at the grocery store, pick up some dip-able white chocolate. You can usually find this in the crafts section or near the produce. Also pick up some red food dye.

Melt your chocolate in the microwave in bursts of 15-20 seconds. It doesn’t take long to melt the chocolate so be sure to keep an eye on it.

Set aside some of the white chocolate and then add 2-3 drops of the red food dye to the remaining white chocolate. Dip your washed strawberries into the pink chocolate and place on wax paper. Next, dip the bottom part of a spoon/fork into the white chocolate and drizzle on top of your pink strawberry to add a decorative effect. Place in the refrigerator until they are cooled.

You can mix up the chocolate colors (ie. White dipped, pink drizzle; dark dipped, white drizzle) and place the strawberries in a sweet box. Add a ribbon and a card!

DIY

Take the Pledge to Buy Handmade

12/08/2008

To learn a new recipe or diy project, just explore around the DIY pages of Miseducated and within the links section above for some of our favorites!

I’m sure many of you crafty girls have your own shops so please post your shops and urls here! If you have your own idea for a project you’d love to share, simply email us at [email protected] as always! We love to hear from you.

Why buy handmade?

Buying Handmade makes for better gift-giving.
The giver of a handmade gift has avoided the parking lots and long lines of the big chain stores in favor of something more meaningful. If the giver has purchased the gift, s/he feels the satisfaction of supporting an artist or crafter directly. The recipient of the handmade gift receives something that is one-of-a-kind, and made with care and attention that can
be seen and touched. It is the result of skill and craftsmanship that is absent in the world of large-scale manufacturing.

Buying handmade is better for people.
The ascendancy of chain store culture and global manufacturing has left us dressing, furnishing, and decorating alike. We are encouraged to be consumers, not producers, of our own culture. Our ties to the local and human sources of our goods have been lost. Buying handmade helps us reconnect.

Buying handmade is better for the environment.
The accumulating environmental effects of mass production are a major cause of global warming and the poisoning of our air, water and soil. Every item you make or purchase from a small-scale independent artist or crafter strikes a small blow to the forces of mass production.

Learn more and take the pledge at http://www.buyhandmade.org