Browsing Tag

Crafts

Crafts DIY

Decadently Decorate your Camera

09/30/2009
w194587369

Once I saw the milk chocolate camera on Fuji’s official website, I knew I had to decorate it with sweets and delicious desserts as much as I could! haha

w203001227

Here I bought some very cute plastic sweets (cabochons) from shops at Yu Chau Street in Hong Kong. The street is very popular for its accessory shops. You can find a broad variety of components with different styles, which can be used in DIY (such as earrings, brooches, etc.) or to customize anything you like!

WOW… yummy!!!

w203001225

This is my nude camera and the components.

w203001228

Finally I squeezed all the sweets and cream on it! haha!!!! Love it so much! 😀

My boyfriend nearly cried after seeing the new look of the camera (that HE had bought me). He thinks it is to abnormal for one to carry such a cluttered, exaggerated camera to take photos. hehe.. but then I read the information about Miseducated, “Be who you are and say what you feel, because those who mind don’t matter and those who matter don’t mind.” – Dr. Seuss, hoho! That’s right! I know my boyfriend really doesn’t mind my crazy works. It’s really important for us to be who we are or else we will lose our own personalities and the ability to imagine and create new things! 😀

Crafts DIY

Create an Owl to be your Pal

09/24/2009

So you want to create a ‘fuggly’ owl to be your pal? Though yours doesn’t have to be fuggly, that’s just the way I sew! (hehe)

1. Cut out two triangles (one small one, one bigger one) with slightly curved edges as seen.

note: it’s not an exact science, so you may like to experiment with longer, shorter, wider, thinner, curvier triangles.

2. Face the fabric inwards and sew up one side. As you sew, pull the two fabric edges so that they are together. There will be a gap where the ‘A’ triangle ends. Continue sewing up along the side of B triangle, then back down along the other side.

3. Sew around the bottom opening so that you can pull on the thread and draw the bottom closed like a drawstring bag. Fill it with filling and pull the bottom closed.

note: I use grain but wool or polyester stuffing is also good. Do not fill it up too much!

4. Fold the top down and secure it. This makes the beak.

note: This is why you don’t want to fill it too much because you wont be able to pull the beak far down, though some people like very small beaks. If so then fill it up lots!

5. Add eyes.

note: Beads work well. Fabric has a tendency to fray when cut too small. Don’t learn this the hard way!

Escapeland

Happy 35th Anniversary Hello Kitty!

09/02/2009

Hello Kitty fan? YES please! So she might not exactly be the most mature idol to have but she sure is the cutest. Hello Kitty has made my world bright since I was born in the 80s (she’s been kicking it since 76′) so it’s about time I devoted a little space in Miseducated to the fantastic feline herself.

I say feline loosely because I really mean the kitty cat, sugar*puff, white marzipan saccharine sweetie and thief of hearts worldwide.

Miseducated wants to take a chance to wish Hello Kitty (and one of the greatest companies ever, Sanrio) and all of her friends a very HAPPY ANNIVERSARY and all the delightment and rainbow glitter dust in the world! We have dedicated a place and shrine for you, Kitty White. You inspire us to no end and will keep doing so until the end of time!

drawing kitties

Official Kitty

Sanrio Town
Hello Kitty Online
Sanrio USA
Sanrio Japan
35th Anniversary: Hello Kitty Colors
Harmony Land
Puroland

Kitty Goodies

ASCII Art
DIY Crafts
Sanrio Art Center
Seed Bead Kitty Pattern
Kitty Pony Bead Pattern
Keroppi Pony Bead Pattern

Kitty Fanpages

Hello Kitty Fanlisting
Hello Kitty Fan
Sanrio Salon
Twin Star Haven
Pink Sugar Ichigo
KT Sanctuary
Hello Kitty Food Flickr
Hello Kitty Tea Party
Hello Kitty Minutiae

Kitty Mail


Sanriotown.com Free E-Mail
user name
@
password

New User? Sign Up Now!

SUBMIT

Submit your fanpages, goodies and anniversary gifts for the Miseducated Kitty shrine! Just attach to your comment below.

Stay tuned for more Kitty goodies in the future!

DIY Recipes

Cat and Kitten Recipes for Tea and More

08/20/2009

Worried about kitty’s food allergies? ASPCA has the word on those. Make sure you don’t use any ingredients that will harm your krazee kitty!

If you’re having a kitty party and having all the kitties in your neighborhood over, don’t. Kitties prefer having tea parties with their own families and are very territorial, especially when catnip and tuna are involved!

Kitty’s Cookies

1 cup of all-purpose flour
1/4 cup of whole wheat flour
2 tablespoons of wheat germ
2-4 tablespoons of catnip
1/3 cup of water
1/3 cup goat milk
2 tablespoons of vegetable oil
1 tablespoon of molasses
1 egg

Begin by pre-heating the oven to 350*F.
Combine the dry ingredients in a bowl (flour, wheat germ and catnip).
Combine the wet ingredients in a bowl (egg, milk, vegetable oil, and molasses.
Mix the wet and dry ingredients together and work it into a dough
Lightly flour the counter or other work surface
Remove a portion of dough and use a rolling pin to uniformly flatten the dough to a thickness between 1/8 of an inch and 1/4 of an inch.
Cut the dough into 1-inch squares using a rolling pizza cutter or a cookie cutter of your choice.
Place the cookies on a lightly greased cookie sheet.
Bake the cookies for 10 to 15 minutes, or until the cookies are crisp and lightly browned.
This recipe will make approximately 50 medium-sized cat treats.

Once the treats have cooled, gently remove them and place the cookies into several small freezer bags.

Tuna Surprise Kitty Bonbons

1 cup whole wheat flour
1/2 can tuna, in oil or 1/2 cup cooked chicken, chopped into small pieces
1 tablespoon vegetable or cod liver oil
1 egg, beaten
1/4 cup water

In large bowl, mash the tuna (or chicken). Add the flour, mixing well. Stir in the water, oil and egg, mixing well. Mixture will be sticky.
Shape mixture into 1/2-inch sized balls. Place on greased baking sheets. Press balls to flatten.

Bake at 350*F (175*C) for 10 minutes. Remove treats from oven; let sit 5 minutes and then turn treats over and bake another 10 minutes or until golden brown. Cool completely on wire rack. Store in an air tight container in refrigerator.

Tuna Pops

Drain liquid from tuna packed in spring water. Freeze liquid in small ice cube trays (cocktail ice cube trays work nicely, fish shaped from IKEA trays? double points!). Give no more than 2 cubes at 1 time as a treat. Reuse your can of drained tuna by placing in it an airtight container and covering with filtered water overnight for a second batch of tuna-pop water.

Catnip Tea

tea ball loaded with catnip
1 cup Water

Put the catnip in a bottle, pour in the water. Put the cap on the bottle,and shake until the catnip tea is green.

Preserving your Cooked Treats

Since these treats are preservative-free, they will not last forever. So to extend their lives, store them inside the freezer in several small freezer bags. As needed remove a bag from the freezer and leave it out for several hours to thaw. Once the treats are thawed, transfer into a Tupperware container for easy access and store the treats inside the refrigerator for up to two weeks.

Crafts DIY

Create Your Own Mosaic Frame

04/14/2009

Before you begin

Choose boxes or frames “unfinished”; paint them with acrylic paint gold or silver (or whatever color you want, depending on your color scheme) just to have a base for the tiles to stick to. I don’t like to show raw wood between tiles because I don’t use grout in between the tiles (too messy and may scratch). Paint back and edges.

Create Mosaics

Supplies

Polymer clay (various colors)
Acrylic roller and/or pasta machine
Cookie cutters and craft blade
Stamps ( rubber or any texture you find around your house)
Acrylic paint and brushes
Metallic powders
Varnish for polymer clay
Glue (Liquid nails or Weldbond are good)
Oven (don’t use you home oven)

Creating Mosaics

Paint white tiles as if they were little canvases using acrylic paint.. get creative! Use more than one color. Paint a single tile with multi colors or a landscape, try to make small pictures.. tell a story.

Mosaics with Texture

Cut the polymer clay until desired thickness, approx. 3mm ( see picture ). Gently stamp with your texture (I use toy palms in this case, you can use any texture like buttons, stamps, texture sheet, etc ). You can use mica powders or metallic powders to enhance the texture, then cut my tiles with the cookie cutters or a blade (squares are easy to arrange on you frame). I bake them following the instructions for the polymer clay brand. I don’t like to use a regular oven (fumes).

Mosaics with Stamps

Paint white tiles with acrylic paint, before they dry gently stamp them, it will take the paint off the tile creating a negative image of the stamp. Use rubber stamps for this and wash them after each use.

Making the Mosaic Mirror

I classify the mosaics by color, so they are easy to arrange when designing the mirror.
Arrange tiles on the frame as a puzzle and when you like the composition glue each tile. You may use ceramic tiles, milagros, beads, etc. just to have different textures and fill spaces when I don’t find the correct size of tile.
The last step is varnishing the tiles.

Use your imagination and have fun!

Create Mosaics
Crafts DIY

Create Easy Macaron Charms with Clay

03/25/2009

Finally, I was able to catch some sun through my tiny window and take some photos, so here is the step-by-step process to make polymer clay macarons!

Easy Macaron Jewelry

Instructions

1. Make 5 balls: 2 bigger, 2 smaller and 1 of a different colour
2. Slightly flatten the 2 bigger, and completely the 2 smaller
3. Put each “slightly flat” with a “very flat” and flatten the different coloured one too
4. Make a “sandwich” with the 3 of them
5. Ruffle what exceeds form the sandwich with an instrument like a tooth pick
6. Put it in the oven for half an hour (depends on the clay you use)
7. Do not eat!

DIY Recipes

Get in a Dandelion Daze with Recipes and More

03/10/2009

With spring just around the corner, you may find yourself longing for the childhood days of frolicking in flowered fields and making wishes on dandelion puffs. And why not? You may now settle for city parks in place of flowered fields, but you’re never too old or too urban to enjoy a fluffy dandelion.

But did you realize your favorite sunny weed has more uses than just wishful blowing?
Read on and stock up, but don’t worry, the supplies are located in your own backyard.

dandelion days

Nourishment

Yes, dandelions can be eaten. Full of vitamins and minerals, the leaves of the dandelion flower can be tossed in salads or layered into sandwiches for a healthy boost to your meal. However, these greens are best picked before the plant has flowered, otherwise they tend to be bitter in taste.

Drink

While your salad uses the leaves, dandelion wine uses the tiny yellow petals to create a unique beverage for your next picnic. Up for the challenge of making your own? Try this unique recipe courtesy of TheCompostBin.com.

Detox

Dandelions are chocked full of antioxidants, make wonderful diuretics, and act as amazing liver cleansers. Brew a cup of dandelion tea to ease stomach problems and detox your liver after overindulging in that dandelion wine.

Skin care

The juice of the dandelion plant has been used throughout the years to treat skin rashes and ailments. It’s said to have antibacterial properties and can supposedly clear warts and sooth eczema. Meanwhile, dandelion supplements have been used in Chinese medicine for centuries. The roots and leaves of the plant in pill form detoxify the blood and can help clear up acne.

Good Luck

Feeling crafty? Weave yourself some sunshine accessories in the form of a dandelion wreath and you’re on your way to a lucky day. Just make sure it’s one you’ve crafted yourself, superstition states that wearing one from a friend can actually take luck from you.

And if all else fails: find a fluffy one, close your eyes, make a wish, and blow.

Crafts DIY

Sew a Blythe Doll Skirt in Minutes

12/20/2008

It’s super easy to sew a simple felt skirt for your Blythe! This is an easy pattern to try, even if you’ve never sewn or embroidered before. Feel free to download a PDF of the printable pattern here.

DIY Blythe Skirt

You Need

1 piece of felt, approximately 6×4 inches
Embroidery floss in 2-3 colors
Small piece of velcro
Needle
Scissors

Step 1

Print and cut out the skirt pattern, use it to cut a piece of felt the same shape.

Step 2

Embroider a design. Even if you’ve never embroidered before, you can
easily make a pretty design with variations on just one simple stitch. Thread your needle, tie a knot in one end and pull the floss through from the backside. Put your needle back down through the felt again, there you have a Straight stitch! You can trace the flower design onto your skirt with fabric transfer paper, but you might find it easier to just stitch it up freehand. The flower is several Straight stitches in a circle, the center of the flower is Satin stitch, several Straight stitches side by side. For the
vine, make several small Straight stitches in a line, one after the other. This is called a Running stitch.

Step 3

Sew one side of the velcro to each end of the skirt, one on the front and one on the back. Dress up your dolly in your cute new creation!

Crafts DIY

Do-it Yourself Holiday Gifts

11/14/2008

If you can’t find me on any given Saturday afternoon, I’m likely perusing the aisles at my local flea market or antique store. You see, since I was a wee thing, I’ve been obsessed with all things old and lovely. And what better place to find “old and lovely” than at a store that sells items of the past?

Remember, the difference between flea markets and antique stores is this: Antique stores have done the dirty work for you and have found the best of the best vintage doo-dads. As a result, their prices are higher. Flea markets, on the other hand, are a composite pile junk-things and fabulous finds. Consequently, the prices are much lower.

With that said, I find pleasure in both types of stores. However, I personally feel that flea market browsing is a much more satisfying experience. It’s like I’m a superwoman saving all these beautiful items hidden among the rubble! If flea markets are the way you want to go, keep in mind that it takes patience and a lot of time to have a successful shopping trip.

Now, without further ado, here are a few unique ideas that are half DIY, half vintage-fab. And I promise, they are oh-so-easy to do!
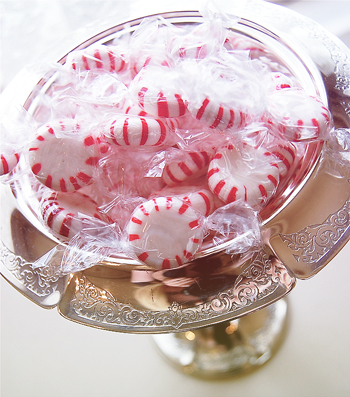
The Candy Dish

I promise that any flea market/thrift store/antique mall will have myriad exquisite dishes. In fact, these items are one of my most favorite to look for, simply because they are easy to find and almost always affordable and different. The best candy dish finds are the ones that have a lid (helps keep the candy fresh!) and are one-of-a-kind. For example, I once purchased a fabulously decadent, blue-glass dish that floated on a stem. Once you find the perfect dish that fits the receivers personality, add some of their favorite candy! Individually wrapped chocolates are always a hit!

Framed Vintage

You can frame pretty much anything you want, but one of my favorites is either sheet music or old magazine ads. These items are usually very inexpensive ($1-$5 on average) and offer a great variety of styles. Just browse through the selection and set aside the items that speak to you. Now that you’ve got your item, all you need to do is frame it. Depending on the recipient and the item to be framed, I like to purchase a modern-looking frame to offset the vintage look or purchase an older frame to drive the point home!

Tip If you can’t bring yourself to tear a page out of a magazine, simply make a color-copy!

The Vase

Vases are another easy find at any thrift store, flea market or antique mall. And just like the candy dishes, there is often a great variety in style and color. I am often drawn to opulant items and so for me, the fancier the better! Since you are purchasing for someone else, try to find a vase that reflects the personality of whoever is receiving the gift.

Once you’ve purchased the vase, head to your local flower shop with the vase (clean it up first, of course!). Ask the shop owner which flowers would look best in the vase and go from there.

Tip You don’t have to buy a large bouquet. A few flowers in a beautiful vase makes a bold statement.

Cookie Jar Frenzy

Who doesn’t love cookies? And if you have cookies, why not store them in a beautiful cookie jar? On your next vintage-outing, search high and low for some interesting jars. I’ve seen plenty in my day, ranging from refined and exquisite to gaudy and fun!
Once you have your jar purchased, clean it out and make a batch of the recipients favorite cookies.

Tip To add more vintage snazz to this gift, put the recipe for the cookies on a vintage inspired (or actual vintage) recipe card and include it with the gift!
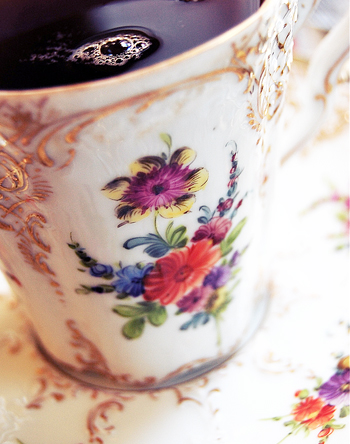
Sweet Tea Cup

This is one of my favorites. All you have to do is find a lovely tea cup and saucer set. These are usually priced quite low – anywhere from $4 to $25. After you find the cup and saucer of your dreams, purchase some nice tea bags and a few honey sticks. Put said items in your tea cup and wrap the cup/saucer in tinted (or clear) cellophane. You can usually find cellophane at craft stores (I know Target sells some, too). I like to add a ribbon bow at the top for an extra touch of pretty.
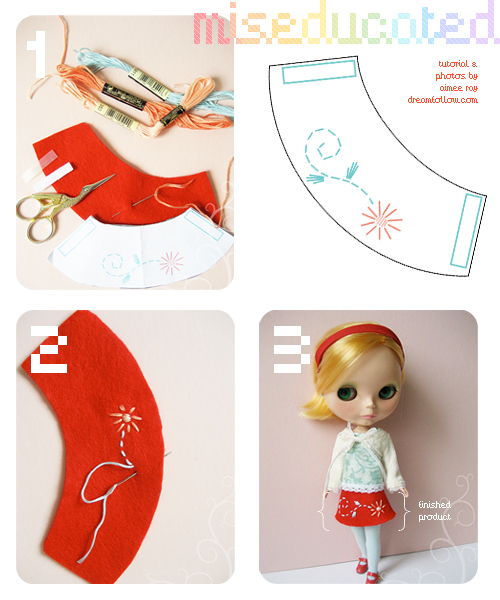
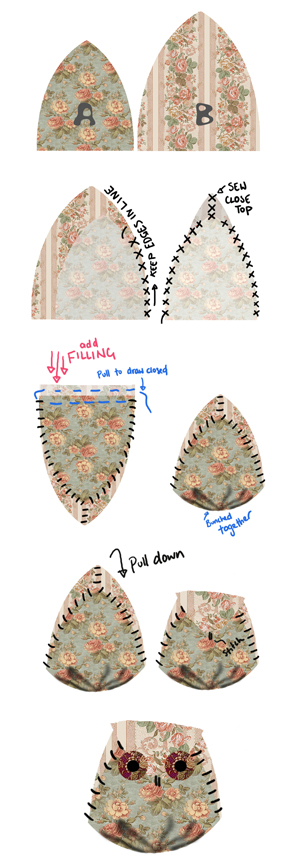
Crafts DIY

Easy, Colorful Jewelry and Plasticandy Bracelets

11/10/2008

I guarantee if you enjoy making cute, simple items this has been or will become your new favorite hobby. Preferably when drinking, relaxing, listening to records grab out your big bowl of pony beads and plastic jewelry bits. Grab some elastic cord, elastic string, invisible elastic, etc~ make sure it’s stretchy and not annoying to work with. Go to a craft shop and look in the bead/jewelry section to find a selection of elastic cord. Double stringing the bracelets is also a great idea if you’re rough on your jewelry!

starbrights plasticone

Next, pick out a color scheme or shapes you like and string the beads onto the double cord. When the beads are on the cord long enough that you can easily wrap it around your wrist with no spaces between beads, Tie it. Tie it very secure and then dab a drop of clear nail polish or super glue on the knot and let it dry.

After it’s dry put the bracelet on or give it to a friend (ideal). Deck your arms out in your best ones when you’re going out to a fun club, party or rave for the night and hand out bracelets to friends and people you meet. You’ll find that when you go out and have fun you’ll usually come home with one or no bracelets. Now it’s time to make more!