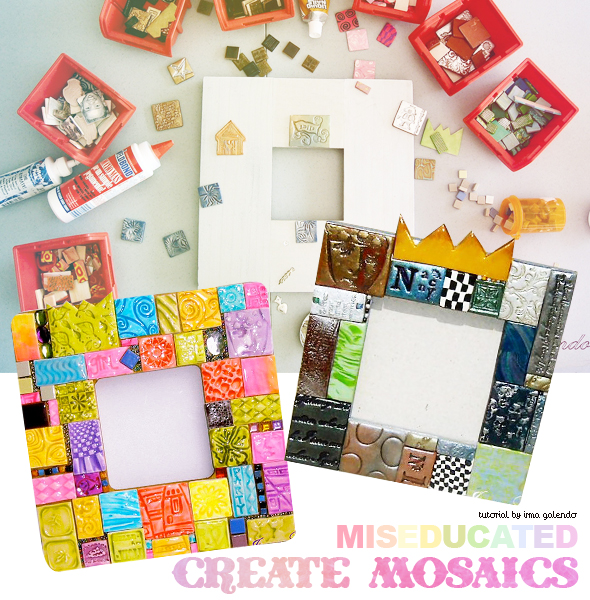
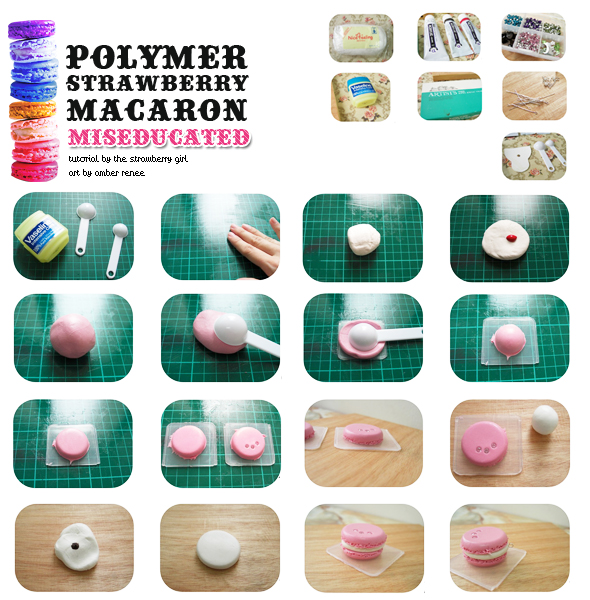
Browsing Tag

DIY

Crafts DIY

Create Your Own Mosaic Frame

04/14/2009

Before you begin

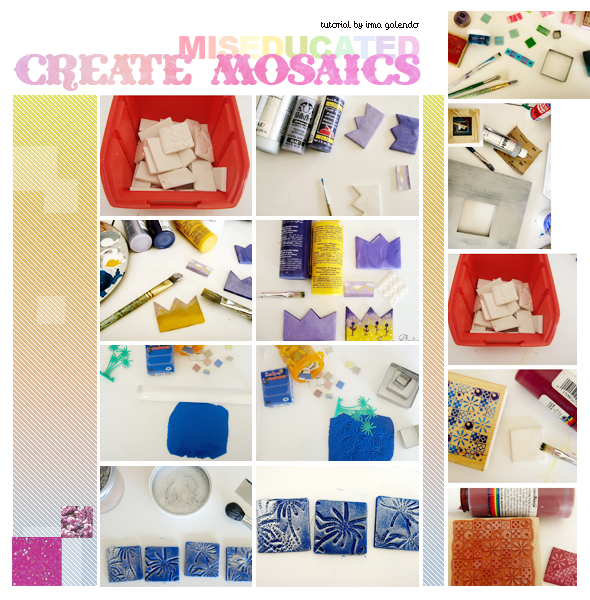
Choose boxes or frames “unfinished”; paint them with acrylic paint gold or silver (or whatever color you want, depending on your color scheme) just to have a base for the tiles to stick to. I don’t like to show raw wood between tiles because I don’t use grout in between the tiles (too messy and may scratch). Paint back and edges.

Create Mosaics

Supplies

Polymer clay (various colors)
Acrylic roller and/or pasta machine
Cookie cutters and craft blade
Stamps ( rubber or any texture you find around your house)
Acrylic paint and brushes
Metallic powders
Varnish for polymer clay
Glue (Liquid nails or Weldbond are good)
Oven (don’t use you home oven)

Creating Mosaics

Paint white tiles as if they were little canvases using acrylic paint.. get creative! Use more than one color. Paint a single tile with multi colors or a landscape, try to make small pictures.. tell a story.

Mosaics with Texture

Cut the polymer clay until desired thickness, approx. 3mm ( see picture ). Gently stamp with your texture (I use toy palms in this case, you can use any texture like buttons, stamps, texture sheet, etc ). You can use mica powders or metallic powders to enhance the texture, then cut my tiles with the cookie cutters or a blade (squares are easy to arrange on you frame). I bake them following the instructions for the polymer clay brand. I don’t like to use a regular oven (fumes).

Mosaics with Stamps

Paint white tiles with acrylic paint, before they dry gently stamp them, it will take the paint off the tile creating a negative image of the stamp. Use rubber stamps for this and wash them after each use.

Making the Mosaic Mirror

I classify the mosaics by color, so they are easy to arrange when designing the mirror.
Arrange tiles on the frame as a puzzle and when you like the composition glue each tile. You may use ceramic tiles, milagros, beads, etc. just to have different textures and fill spaces when I don’t find the correct size of tile.
The last step is varnishing the tiles.

Use your imagination and have fun!

Create Mosaics
DIY

Should You Felt Your Knitted Projects?

04/07/2009

Working with wool has become one of my favorite creative endeavors. I love the unique way each article of clothing comes out just a bit differently than another. I use any used or new sweaters and am always on the hunt for vintage wool skirts or jackets to use in my projects. I love to use them to make baby clothes or toys. Little stuffed woolies are lots of fun to make. Using wool makes me feel happy to be able to put to use something someone else believes to be un-useful (is that a word???). No two items I make are alike. I don’t use patterns because I find it easier to ‘eyeball’ the felted sweater and let the colors and textures dictate what will come of it. If you are a ‘pattern person’ (what a title!), you most certainly could use patterns with this kind of felted fabric.

felting

1. Find a beautiful 100% wool sweater that is in good condition. Be sure to check the label carefully. Do not purchase or use one that says it’s okay to ‘Machine Wash’ it. Some wool sweaters have been treated for easier care and do not require dry cleaning… the process they use will prevent it from felting-the desired effect! Use only one that recommends dry cleaning or hand washing.

2. Machine wash in warm water with 1Tbsp. soap or detergent. Wool fibers have little barbs on them and the agitation of a machine wash cycle binds the fibers together. When felted, a garment will shrink and become thick, dense and will not unravel when cut. After washing, check to see if the sweater is now ‘felted’ enough for what you desire to make. If not, either rewash or for further felting, dry it in a warm dryer. If it is rumpley after washing, iron with an iron using the ‘wool’ setting. Wool is a very durable product and responds well to misting and ironing.

3. Once your item is dry and smoothed out with an iron, you may begin to design and construct your item. If making a dress for baby, you can use the neckline or collar area of the sweater for the neckline of your new dress. Sometimes you will need to put darts in the back of the neck or cut it in the back and re-seam it to reduce the size of the neck. Because properly felted wool does not unravel, you will probably not have to hem or bind your hem or sleeves but sometimes I do anyway. A sweet cotton fabric can add a lot for extra detail. The sleeves of the sweater can be used to make leg warmers to match or save them for a pair of hand warmers for yourself or a friend!

4. After your pieces are cut out, sew them together with a machine using either a regular straight stitch or serger. Appliquéing a unique design on your dress or romper will personalize it and add whimsy and interest, but be sure to do the appliqué or embroidery work before you sew front to back; it’s just easier. Above all, have fun! This example is just one of many ways to use wool sweaters. Get creative and enjoy!

Visual Splendor

All About Tea and Tea Time Talk

04/04/2009

There’s nothing that fills my beating heart with as much happiness as a steamy cup of hot tea and the soft pages of a new book. Lucky for me, tea comes in a multitude of flavors, styles and pretty little boxes, all the more reason to spend hours admiring my options in the tea aisle of my local grocery.

Now, I’ve tried a variety of teas in my day, from strawberry iced goodness to chocolate-lovers delight. All have proven to be extraordinary! So, you can imagine my delight when I discovered the positive, health benefits associated with sipping the delicious beverage! And, imagine my double delight as I discovered that each kind of tea has its own benefits to boast! Let me share:

tea time talk

Rooibos (or Red Bush) Tea

This red tea comes from Africa and can do a body good. It is a pure tea, meaning there are no additives, and it helps slow the aging process. This non-caffeinated tea is great to drink before bedtime because it helps with insomnia, headaches, nausea and heartburn!

Herbal Tea

One of the best things about herbal tea is that you can drink it before bedtime (or if you just want to refrain from caffeine in general).

One of the most popular herbal tea’s is world-approved Chamomile. There’s a reason your mother served you chamomile before you laid your sleepy head to rest. One of its most obvious effects is that it is a muscle relaxant! It also helps with skin issues (from rashes to burns to irritation to acne) and fights off all kinds of unwanted illnesses and diseases. Not to mention it smells heavenly…

Anyway, some other great herbal tea’s include: Ginseng (Chinese, cures just about everything just as its name implies: “all heal.”), Ginger (helps with motion sickness/nausea/indigestion), Peppermint (muscle relaxer, stomach cramps, freshens breath), Cinnamon (lowers cholesterol/blood sugar),

Black Tea

I enjoy a Black tea to help wake me up in the morning. I appreciate how stable my body is throughout the day after a hot cup, as opposed to the high and low I get with coffee. Black tea is especially great for cardiovascular issues and is rich in antioxidants and cancer-fighting agents. According to TeaBenefits.com, “Recent studies in leading medical journals declare black tea a potential heart tonic, cancer blocker, fat buster, immune stimulant, arthritis soother, virus fighter and cholesterol detoxifier.”

Some great Black tea’s to try include: Darjeeling and Nilgiri (both from India), Yunnan (Chinese) and Keemun (also from China).

Green Tea

Green tea is famous for its beneficial effects, so it should come as no surprise when I tell you it’s probably the healthiest kind of tea for you! In fact, it’s commonly believed that by drinking more green tea you can increase your longevity and lead a happier life. So what, exactly, are the great benefits? Let me get you started.

Green tea is linked with weight loss, reduces the risk of all types of cancers and lowers cholesterol levels. In addition, it prevents/helps rheumatoid arthritis, infections and inhibits blood clots! All because of a very powerful antioxidant called EGCG (Epigallocatechin Gallate) that stops cancer cells from growing (by killing them), all the while nurturing healthy body tissues. Sweet!

TIP #1: Let your tea bag, or tea strainer for loose tea, steep for at least 3-6 minutes in order to get the most out of it (taste wise and health wise).

TIP #2: Add a slice of lemon to your tea and be amazed as your headache eases (or even melts away completely).

Self Decoration

1940s Beauty, Fashion and Action Resurrection

04/03/2009

Call me crazy, call me zany or simply call me metaphysically inclined. I have always had a sneaking suspicion that in my past lives — I envision two of them, darling — I was a regal sweetheart with a fabulous sense of style.

Oh, and it shouldn’t surprise you that each of my previous cycles on Earth were in equally wonderful eras: Lifetime #1: the European 1750s (I suspect I was a fling of Herr Mozart’s) and Lifetime #2: the legendary American 1940s.

As the title of this article implies, we’re going to focus on the latter, today. And, because I’m ordaining myself as Miseducated’s 40s guru (hey, I lived the life – wink!), I’m going to share with you little ways to incorporate that style into our fresh and fabulous 21st century.

Before we get started, let me say this: Invest in vintage
Kind of a no-brainer. But really, unless you have an air of authenticity about you then you won’t be taken very seriously! Hit up your local flea market, antique store, E-Bay or even Goodwill and you’re bound to find some goodies for a bargain.

1940s resurection

Style Tip #1: Hats and Hair

After you’ve styled your hair appropriately (check out YouTube for some great hair tutorials, like this easy one), literally top everything off with a 40s inspired hat. All sorts of hats were worn back in the day, so it’ll be easy to find a type that suits your fancy! I prefer small hats with a flock of feathers or a tiny, off-to-the-side veil! You’ll be in heaven with all the colors, shapes and sizes there are to choose from!

Style Tip #2: Hot Bod, Hot Dress!

The classic 40s dress is characterized by a cinched waist and flowy bottom half. Polka-dots are a guaranteed hit! Try shopping for some great dresses at Viva La Vintage, Dorotheas Closet Vintage, or Damn Good Vintage. No need to spend tons of money, I’ve found a whollup of pretty numbers on eBay and at Goodwill.

Style Tip #3: Clutch, please!

It’s important to have a purse to carry around, even when you’re prancing in your 40s gear. I mean, really, where else would we keep our lipgoss, cell-phone and identification? A pocket just won’t do! The perfect accessory to your outfit is a sweet little clutch and lucky for you, those are easy to find! Choose a shade that sets the tone you’re after! Roarin’ red? Fabulous! Sparkly sequins? Oh yeah!

Style Tip #4: Such a pretty face!

When it comes to dolling up your face, keep these in mind: luscious, fake lashes will take you far; outline your lips with a pretty shade of red and color them in (be sure to accentuate the “V” on your top lip); wear a rosey-posey blush that’s only subtle enough. Don’t be afraid to have fun with your makeup.

Style Tip #5: Gloves keep your hands clean!

You know they do! They also keep you looking refined, stylish and oh-so 40-licious! I like to keep things pristine with a stark, crisp white. You may be more inclined to roll up a pair of bright yellow duds. Whatever makes you happy is fine by me.

Style Tip #6: Cat-eye glasses

Whether you sport sunglasses or a pair of faux reading glasses, make them snazzy! Try a rhinestone-enhanced, golden cat-eye. Or maybe a subtle black is more your type. Either way, you’ll make a (smart) statement!

Style Tip #7: For the bold: Cigarette holder

I don’t condone smoking (keep your lungs happy, ladies), but a stationary cigarette in a pretty cigarette holder is really kind of drool-worthy. Purchase one for under $5 here and pretend you’re Audrey at the ball.

Bonus

40s slang to slip into your vocabulary. *
• Flat Tire – A dull witted, insipid, disappointing date.
• Cat’s Meow – Something splendid or stylish
• Heebie-Jeebies – The jitters.
• Ossified – a drunk person.
• Scram – Ask someone to leave immediately.
• Whoopee – To have a good time.

As in: Scram, ossified flat tire! You give me the heebie-jeebies when all I want is a cat’s meow whoopee!

*To be used only when employing 40s-inspired style.

DIY Recipes

Vinegar Beauty Recipes for Vamps

03/26/2009

When it comes to DIY Beauty, recipes using vinegar are all the craze. Why? Because vinegar does an excellent job of cleaning, polishing and wiping away impurities. In addition, vinegar is easy to come by, inexpensive and always practical. Here are a few recipes to give a try the next time you’ve got vinegar to spare and money to save!

diy vinegar beauty

Apple Vinegar Hair Rinse

After using various products and chemicals on your hair, it tends to become dull, lifeless and not too healthy. A major culprit of this is product build up. This recipe does wonders for that dilemma and should be done once a week. Here’s what you need:

1 small-medium lemon
2 tablespoons apple vinegar
2 tablespoons warm water

In a small bowl, combine your water and vinegar. Cut your lemon in half and squeeze out the contents of half of it. Make sure to remove any seeds that escape! Mix thoroughly and let it set for 5-10 minutes while you’re washing your hair. After washing your hair in the shower, apply this mixture thoroughly. Let it set for 2 minutes and then rinse out with tepid water (cold if you can bare it).

Vinegar Astringent for your Face

This is great for oily, acne-prone skin and can be whipped up in a flash. All you need is water and a little vinegar and you’re all set. Here’s the specifics:

1 tablespoon apple cider vinegar
2 tablespoons warm water
Cotton balls

Combine both ingredients and dip your cotton ball into the mixture. After using your regular face wash, apply this evenly by wiping the cotton ball around your face. Let it set for 10 minutes and then rinse thoroughly with cold water to tighten pores. Gently pat dry.

Strawberry Vinegar Face Mask

This sweet treat makes your skin glow and is easy to prepare. Gather these items:

5-6 medium sized strawberries
1 tablespoon apple cider vinegar
1 egg white

First, separate your egg yolk from your egg white into a medium sized bowl. In a separate bowl, mash your strawberries until they are relatively smooth/consistent. Add the egg white to your strawberries and mix well. Gradually add the vinegar and stir until you have a nice paste.

After washing your face with your typical face wash, apply the mixture generously onto your face. Let it set for 15 minutes and rinse with warm water. Splash cold water on your face to tighten pores and gently pat dry.

spoon full of vinegar
DIY Self Decoration

The Beauty Benefits of Bathing in Tea [in Australia]

03/25/2009
Bathing in Tea

Have you ever loved a food or drink so much that you wish you could bathe in it?

I’m a huge fan of tea: the immune boost, the antioxidants, the warm fuzzy feeling of a hot mug on a cold night. I think my ultimate evening consists of curling up on the couch with a cup of tea and a box of cookies for dunking. In short, I truly do love tea so much that I could bathe in it… and last year, I did.

The time: early spring. The location: Lennox Head, Australia. I had the amazing opportunity to visit my sister at her work abroad location there and her camp was located just steps away from Lake Ainsworth, a freshwater lake made entirely out of tea.

Surrounded by tea trees, Lake Ainsworth’s waters absorb tannins from surrounding tree roots and fallen tea leaves, transforming the waters into a deep, dark brew. The locals believe that the water has healing properties and that a quick swim can do wonders for the skin. Personally, though my skin did feel a bit softer that day, it’s my mind that has never felt more at peace than while floating in a bath of tea.

Want to try it yourself?

If you can’t make the trip Down Under, don’t worry, just run yourself a hot bath, drop in several tea bags, lay back, and relax.

Feeling crafty?

You can also create your own concoction with loose tea leaves and dried flowers. Once it’s ready, wrap your personalized mixture in muslin or cheesecloth (or pantyhose — thanks, Wendy!) and you‘re ready for a long, relaxing steep.

Other Drinks to Soak In

  • Sake: A Geisha secret, pouring a cup full of sake into your tub is said to soften your skin and speed up your metabolism.
  • Milk and Honey: Milk dissolved dead skin cells to make your skin baby soft, while honey has antibacterial properties to help heal wounds. It worked wonders for Cleopatra, so why not you?
  • Red Wine: Teri Hatcher of Desperate Housewives breaks out the vino for her bath to make her skin lush and glowing…just don‘t use too much or you might stain your tub!
Crafts DIY

Knot Your Own Fortune Coins Necklace

03/25/2009

Hi, my name is Amanda Yu, I am the owner and designer of ”Exotic Flavour” the colorful, playful and creative jewelry design. I am grateful that I had been invited by Miseducated to prepare this DIY story for you. I hope you will like it. I will show you how to make this Fortune Coins Pink Necklace.

fortune necklace

Instructions

1. The material is very simple, prepare a Pink cotton cord (length: 155cm and thick: 3mm) and Sex piece of the round wood ornament with a hole in the middle.
2. Put on one wood ornament and make a knot. This is a part of the clasp.
3. Coil two small circles, hold tight with your left thump.
4. Round the third circle between the first two circles, pull the cord generally.
5. Put another wood ornament and repeat (3.) and (4.) until you have five patterns.
6. In the end of the cord I made an oriental cross knot and tight it nicely.
7. If you think it is complicated, you can make any knots you like. Just make sure the little circle is not too big for the wood ornament – other part of the clasp. (1)
8. The Fortune Coins Pink Necklace is now finished.

I hope you find this is inspiring. You can combine with different materials or perhaps develop another construction from this basic oriental knot. Here are two other creation I made earlier based on the same techniques.

Crafts DIY

Sew an Adorable Business Card Case

03/25/2009

I love this cute business card case. It’s an easy-to-make, quick project and it has such a big impact when it is finished. I love how easy it is to customize to your own taste (by choosing different colors and different ribbon) so it can really represent your own business style. I use a sewing machine to make it, but it would be perfectly fine to hand-sew the case if you don’t have a machine.

diy business card case

Supplies

1/8 yard of wool felt
12″ of ribbon (I used two pieces of 12″ ribbon in my case)
thread
optional: pinking shears

Instructions

1 Cut four pieces of wool felt: two pieces are 5.5″ by 4.25″, the other two pieces 4.75″ by 4.25″.
2. Fold the smaller piece in half so that the folded edge is the one that is 4.25″ across. Sew along the folded edge. I use the edge of my zipper foot as a guide when I sew to help make this seam straight – just line the edge of the fold up with the edge of your foot.
3. Optional: I use pinking shears to trim the seam and give the edge a more decorative look. You don’t have to do this step if you would like your edge straight.
4. Repeat with the other small piece of fabric.
5. Cut your ribbon in half. Pin one piece of ribbon onto each of the shorter edges of one of your larger pieces of felt. Fold the edges under your felt before you sew so they will be caught by your stitching and held securely in place. Stitch a seam across both edges of the ribbon to hold it in place.
6. Make a sandwich with all of your pieces: first lay your felt with the ribbon face down, then the other large piece of felt. Then place one of your folded pieces at each edge (with the stitched edges toward the center). Pin all these layer together so they don’t move while you sew them.
7 Stitch carefully around all the edges.
8. Optional: I use my pinking shears again to add a decorative edge to the bottom.
9. Yea! You’re finished! Fold your case in half, insert business cards into each side, and enjoy!

Crafts DIY

Create Easy Macaron Charms with Clay

03/25/2009

Finally, I was able to catch some sun through my tiny window and take some photos, so here is the step-by-step process to make polymer clay macarons!

Easy Macaron Jewelry

Instructions

1. Make 5 balls: 2 bigger, 2 smaller and 1 of a different colour
2. Slightly flatten the 2 bigger, and completely the 2 smaller
3. Put each “slightly flat” with a “very flat” and flatten the different coloured one too
4. Make a “sandwich” with the 3 of them
5. Ruffle what exceeds form the sandwich with an instrument like a tooth pick
6. Put it in the oven for half an hour (depends on the clay you use)
7. Do not eat!

Crafts DIY

How to Create the Perfect Polymer Macarons

03/25/2009

I believe many girls love macarons. Tell me who can resist the delicious and cute looking French macaron?

macaron diy

Besides the edible macaron, macaron accessories are also very popular in Japan and all around the world. There are may ways to make macaron accessories for yourself or for your little Blythe. The simplest way is to use air dry clay or polymer clay. In this tutorial, I choose to use air dry clay because I don’t like to use polymer clay that has to be cured in the oven.

macaron diy

You Need

Acrylic paint (any colour you prefer)
Clay cutter and measurement spoon (size is up to you)
9-pin
Embedded crystals (any colour you prefer)
Vaseline Petroleum Jelly or hand lotion
Air dry clay (you can use polymer clay which needed heat up in oven to cure)

Steps

1. Apply the Vaseline (or hand lotion) on the tools and surface that will contact with the clay. This step is important to avoid the clay stick at the tools or surface.
2. Apply the Vaseline on the surface and your hands too.
3. Cut this amount of clay (enough to make two macarons).
4. Put a little red acrylic paint on top of the clay (I chose red because I want to make a pink macaron).
5. Twist and rub the clay until the colours mixed evenly with the clay.
6. Then put the measurement spoon on top of the clay.
7. Press down so to get a shape alike the shape of the measurement spoon
8. Please see if it looks like the photograph above.
9 Then use any flat surface to press it down until it looks like this.
10. Repeat the step 6 to 9 for the bottom piece. Some embedded crystals are put on top of the top piece.
11. As shown in this picture.
12. Cut this amount of clay.
13. Put a little bit dark brown acrylic paint on top of the clay (to add some colour to the filling) then twist and rub the clay until the colour mixed evenly with the clay.
14. Then use any flat surface to press it down until it looks like this.
15. Sandwich the white clay in between the top and bottom pieces of pink macaron.
16. If you want to make accessories with it, you have to add a 9-pin. Enter the 9-pin from the side.
17. Set aside the clay macaron for two days for completely air dry.

Tips

1. I recommend you to trim your nails first before handling the clay, because clay tends to stick to long nails.
2. Make sure all the tools and surface are dust free to avoid any dust twisted or rubbed into the clay.
3. In case the clay become dry, add a few drop of water to get back the flexible feeling.