Browsing Tag

Marie Antoinette

DIY Self Decoration

The Beauty Benefits of Bathing in Tea [in Australia]

03/25/2009
Bathing in Tea

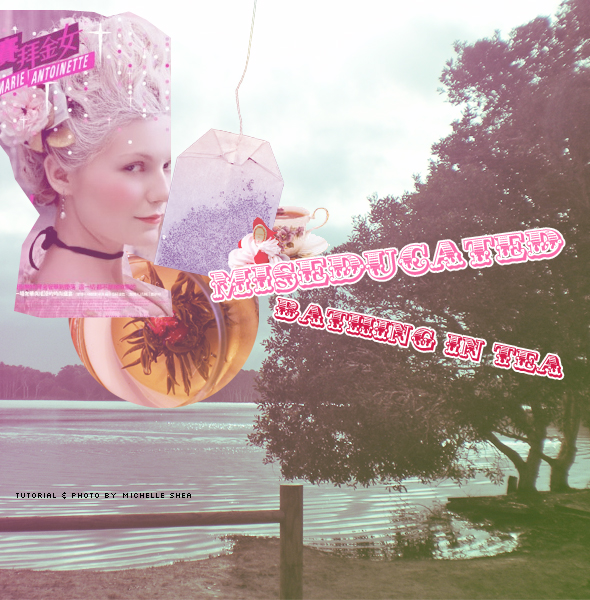
Have you ever loved a food or drink so much that you wish you could bathe in it?

I’m a huge fan of tea: the immune boost, the antioxidants, the warm fuzzy feeling of a hot mug on a cold night. I think my ultimate evening consists of curling up on the couch with a cup of tea and a box of cookies for dunking. In short, I truly do love tea so much that I could bathe in it… and last year, I did.

The time: early spring. The location: Lennox Head, Australia. I had the amazing opportunity to visit my sister at her work abroad location there and her camp was located just steps away from Lake Ainsworth, a freshwater lake made entirely out of tea.

Surrounded by tea trees, Lake Ainsworth’s waters absorb tannins from surrounding tree roots and fallen tea leaves, transforming the waters into a deep, dark brew. The locals believe that the water has healing properties and that a quick swim can do wonders for the skin. Personally, though my skin did feel a bit softer that day, it’s my mind that has never felt more at peace than while floating in a bath of tea.

Want to try it yourself?

If you can’t make the trip Down Under, don’t worry, just run yourself a hot bath, drop in several tea bags, lay back, and relax.

Feeling crafty?

You can also create your own concoction with loose tea leaves and dried flowers. Once it’s ready, wrap your personalized mixture in muslin or cheesecloth (or pantyhose — thanks, Wendy!) and you‘re ready for a long, relaxing steep.

Other Drinks to Soak In

  • Sake: A Geisha secret, pouring a cup full of sake into your tub is said to soften your skin and speed up your metabolism.
  • Milk and Honey: Milk dissolved dead skin cells to make your skin baby soft, while honey has antibacterial properties to help heal wounds. It worked wonders for Cleopatra, so why not you?
  • Red Wine: Teri Hatcher of Desperate Housewives breaks out the vino for her bath to make her skin lush and glowing…just don‘t use too much or you might stain your tub!
Crafts DIY

Create Easy Macaron Charms with Clay

03/25/2009

Finally, I was able to catch some sun through my tiny window and take some photos, so here is the step-by-step process to make polymer clay macarons!

Easy Macaron Jewelry

Instructions

1. Make 5 balls: 2 bigger, 2 smaller and 1 of a different colour
2. Slightly flatten the 2 bigger, and completely the 2 smaller
3. Put each “slightly flat” with a “very flat” and flatten the different coloured one too
4. Make a “sandwich” with the 3 of them
5. Ruffle what exceeds form the sandwich with an instrument like a tooth pick
6. Put it in the oven for half an hour (depends on the clay you use)
7. Do not eat!

Crafts DIY

How to Create the Perfect Polymer Macarons

03/25/2009

I believe many girls love macarons. Tell me who can resist the delicious and cute looking French macaron?

macaron diy

Besides the edible macaron, macaron accessories are also very popular in Japan and all around the world. There are may ways to make macaron accessories for yourself or for your little Blythe. The simplest way is to use air dry clay or polymer clay. In this tutorial, I choose to use air dry clay because I don’t like to use polymer clay that has to be cured in the oven.

macaron diy

You Need

Acrylic paint (any colour you prefer)
Clay cutter and measurement spoon (size is up to you)
9-pin
Embedded crystals (any colour you prefer)
Vaseline Petroleum Jelly or hand lotion
Air dry clay (you can use polymer clay which needed heat up in oven to cure)

Steps

1. Apply the Vaseline (or hand lotion) on the tools and surface that will contact with the clay. This step is important to avoid the clay stick at the tools or surface.
2. Apply the Vaseline on the surface and your hands too.
3. Cut this amount of clay (enough to make two macarons).
4. Put a little red acrylic paint on top of the clay (I chose red because I want to make a pink macaron).
5. Twist and rub the clay until the colours mixed evenly with the clay.
6. Then put the measurement spoon on top of the clay.
7. Press down so to get a shape alike the shape of the measurement spoon
8. Please see if it looks like the photograph above.
9 Then use any flat surface to press it down until it looks like this.
10. Repeat the step 6 to 9 for the bottom piece. Some embedded crystals are put on top of the top piece.
11. As shown in this picture.
12. Cut this amount of clay.
13. Put a little bit dark brown acrylic paint on top of the clay (to add some colour to the filling) then twist and rub the clay until the colour mixed evenly with the clay.
14. Then use any flat surface to press it down until it looks like this.
15. Sandwich the white clay in between the top and bottom pieces of pink macaron.
16. If you want to make accessories with it, you have to add a 9-pin. Enter the 9-pin from the side.
17. Set aside the clay macaron for two days for completely air dry.

Tips

1. I recommend you to trim your nails first before handling the clay, because clay tends to stick to long nails.
2. Make sure all the tools and surface are dust free to avoid any dust twisted or rubbed into the clay.
3. In case the clay become dry, add a few drop of water to get back the flexible feeling.