Browsing Tag

felt

Crafts DIY

Blythe Clothing Pattern Collection

04/15/2010

One of the best things about Blythe is she’s just the right size to whip up an adorable outfit for in a couple of hours (or less!) .. and she looks adorable in anything!

Blythe is known as a model among the community and a creative inspiration. Some of my favorite outfits were handmade painstakingly with a cute photo in mind — yet another creative way to spend your free time.
berrycloth

Sewing Patterns

Puchimadam
XOXO Blythe
Jam Fancy (new)
Jam Fancy (old)
Tshirt

Knit Patterns

Wooly Rockers
knitty

Crochet Patterns

Suncatcher Eyes

.. and remember we have a pattern here as well you should try!

DIY

Should You Felt Your Knitted Projects?

04/07/2009

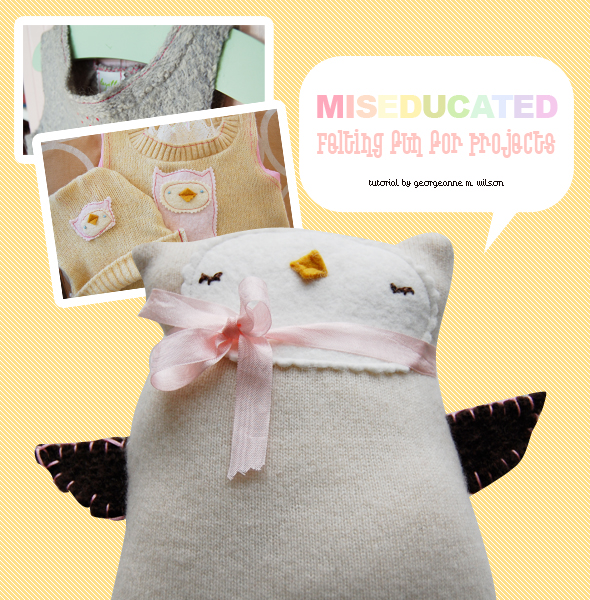
Working with wool has become one of my favorite creative endeavors. I love the unique way each article of clothing comes out just a bit differently than another. I use any used or new sweaters and am always on the hunt for vintage wool skirts or jackets to use in my projects. I love to use them to make baby clothes or toys. Little stuffed woolies are lots of fun to make. Using wool makes me feel happy to be able to put to use something someone else believes to be un-useful (is that a word???). No two items I make are alike. I don’t use patterns because I find it easier to ‘eyeball’ the felted sweater and let the colors and textures dictate what will come of it. If you are a ‘pattern person’ (what a title!), you most certainly could use patterns with this kind of felted fabric.

felting

1. Find a beautiful 100% wool sweater that is in good condition. Be sure to check the label carefully. Do not purchase or use one that says it’s okay to ‘Machine Wash’ it. Some wool sweaters have been treated for easier care and do not require dry cleaning… the process they use will prevent it from felting-the desired effect! Use only one that recommends dry cleaning or hand washing.

2. Machine wash in warm water with 1Tbsp. soap or detergent. Wool fibers have little barbs on them and the agitation of a machine wash cycle binds the fibers together. When felted, a garment will shrink and become thick, dense and will not unravel when cut. After washing, check to see if the sweater is now ‘felted’ enough for what you desire to make. If not, either rewash or for further felting, dry it in a warm dryer. If it is rumpley after washing, iron with an iron using the ‘wool’ setting. Wool is a very durable product and responds well to misting and ironing.

3. Once your item is dry and smoothed out with an iron, you may begin to design and construct your item. If making a dress for baby, you can use the neckline or collar area of the sweater for the neckline of your new dress. Sometimes you will need to put darts in the back of the neck or cut it in the back and re-seam it to reduce the size of the neck. Because properly felted wool does not unravel, you will probably not have to hem or bind your hem or sleeves but sometimes I do anyway. A sweet cotton fabric can add a lot for extra detail. The sleeves of the sweater can be used to make leg warmers to match or save them for a pair of hand warmers for yourself or a friend!

4. After your pieces are cut out, sew them together with a machine using either a regular straight stitch or serger. Appliquéing a unique design on your dress or romper will personalize it and add whimsy and interest, but be sure to do the appliqué or embroidery work before you sew front to back; it’s just easier. Above all, have fun! This example is just one of many ways to use wool sweaters. Get creative and enjoy!

Crafts DIY

Sew an Adorable Business Card Case

03/25/2009

I love this cute business card case. It’s an easy-to-make, quick project and it has such a big impact when it is finished. I love how easy it is to customize to your own taste (by choosing different colors and different ribbon) so it can really represent your own business style. I use a sewing machine to make it, but it would be perfectly fine to hand-sew the case if you don’t have a machine.

diy business card case

Supplies

1/8 yard of wool felt
12″ of ribbon (I used two pieces of 12″ ribbon in my case)
thread
optional: pinking shears

Instructions

1 Cut four pieces of wool felt: two pieces are 5.5″ by 4.25″, the other two pieces 4.75″ by 4.25″.
2. Fold the smaller piece in half so that the folded edge is the one that is 4.25″ across. Sew along the folded edge. I use the edge of my zipper foot as a guide when I sew to help make this seam straight – just line the edge of the fold up with the edge of your foot.
3. Optional: I use pinking shears to trim the seam and give the edge a more decorative look. You don’t have to do this step if you would like your edge straight.
4. Repeat with the other small piece of fabric.
5. Cut your ribbon in half. Pin one piece of ribbon onto each of the shorter edges of one of your larger pieces of felt. Fold the edges under your felt before you sew so they will be caught by your stitching and held securely in place. Stitch a seam across both edges of the ribbon to hold it in place.
6. Make a sandwich with all of your pieces: first lay your felt with the ribbon face down, then the other large piece of felt. Then place one of your folded pieces at each edge (with the stitched edges toward the center). Pin all these layer together so they don’t move while you sew them.
7 Stitch carefully around all the edges.
8. Optional: I use my pinking shears again to add a decorative edge to the bottom.
9. Yea! You’re finished! Fold your case in half, insert business cards into each side, and enjoy!

Crafts DIY

Sew a Blythe Doll Skirt in Minutes

12/20/2008

It’s super easy to sew a simple felt skirt for your Blythe! This is an easy pattern to try, even if you’ve never sewn or embroidered before. Feel free to download a PDF of the printable pattern here.

DIY Blythe Skirt

You Need

1 piece of felt, approximately 6×4 inches
Embroidery floss in 2-3 colors
Small piece of velcro
Needle
Scissors

Step 1

Print and cut out the skirt pattern, use it to cut a piece of felt the same shape.

Step 2

Embroider a design. Even if you’ve never embroidered before, you can
easily make a pretty design with variations on just one simple stitch. Thread your needle, tie a knot in one end and pull the floss through from the backside. Put your needle back down through the felt again, there you have a Straight stitch! You can trace the flower design onto your skirt with fabric transfer paper, but you might find it easier to just stitch it up freehand. The flower is several Straight stitches in a circle, the center of the flower is Satin stitch, several Straight stitches side by side. For the
vine, make several small Straight stitches in a line, one after the other. This is called a Running stitch.

Step 3

Sew one side of the velcro to each end of the skirt, one on the front and one on the back. Dress up your dolly in your cute new creation!