Browsing Category

DIY

Colorful projects that will inspire you to create.

DIY Recipes

Get in a Dandelion Daze with Recipes and More

03/10/2009

With spring just around the corner, you may find yourself longing for the childhood days of frolicking in flowered fields and making wishes on dandelion puffs. And why not? You may now settle for city parks in place of flowered fields, but you’re never too old or too urban to enjoy a fluffy dandelion.

But did you realize your favorite sunny weed has more uses than just wishful blowing?
Read on and stock up, but don’t worry, the supplies are located in your own backyard.

dandelion days

Nourishment

Yes, dandelions can be eaten. Full of vitamins and minerals, the leaves of the dandelion flower can be tossed in salads or layered into sandwiches for a healthy boost to your meal. However, these greens are best picked before the plant has flowered, otherwise they tend to be bitter in taste.

Drink

While your salad uses the leaves, dandelion wine uses the tiny yellow petals to create a unique beverage for your next picnic. Up for the challenge of making your own? Try this unique recipe courtesy of TheCompostBin.com.

Detox

Dandelions are chocked full of antioxidants, make wonderful diuretics, and act as amazing liver cleansers. Brew a cup of dandelion tea to ease stomach problems and detox your liver after overindulging in that dandelion wine.

Skin care

The juice of the dandelion plant has been used throughout the years to treat skin rashes and ailments. It’s said to have antibacterial properties and can supposedly clear warts and sooth eczema. Meanwhile, dandelion supplements have been used in Chinese medicine for centuries. The roots and leaves of the plant in pill form detoxify the blood and can help clear up acne.

Good Luck

Feeling crafty? Weave yourself some sunshine accessories in the form of a dandelion wreath and you’re on your way to a lucky day. Just make sure it’s one you’ve crafted yourself, superstition states that wearing one from a friend can actually take luck from you.

And if all else fails: find a fluffy one, close your eyes, make a wish, and blow.

Crafts DIY

Inexpensive Do-It-Yourself Gifts

03/09/2009

This whole economic downturn has left a lot of the country in a sorry mess, but I’m not here to wallow in financial troubles. No way! I view the scarcity of cash as a wonderful excuse to get crafty! And it’s always more fun to craft for someone else which is what inspired me to create this article.

These gifts are easy to make and inexpensive, to boot! You can make them for a loved one “just because” or give it away for a special holiday. The choice is yours.

diy gifts

Hearty Bread and Jam

For you domestic creatures out there, put your skills to use! Everyone loves an edible gift, especially if it’s made by you! Jam/Jelly is a very easy item to make, it just takes a little bit longer than some foods. Bread and jam come in a variety of forms, so choose the best one for your recipient.

Cozy Blanket

Blankets are also very customizable, making them an ideal gift for any time of the year. Try these different types of blankets:

Crocheted – Choose your recipients favorite colors and have at it! They’ll be thrilled with the amount of time and effort you put into their present.

Tied – Buy two different types of fabric that complement each other. Make sure that you get a big enough size that it serves as a blanket. Both fabrics should be the same size. Next, spread the two fabrics on the floor (one on top of another) and cut around the edge. Each cut should be 2-4 inches deep. Next, tie the two fabrics together (double knot). Do this all around the edge of the blankets. Viola!

Customize – (an already made blanket) One of my favorite gifts from a friend was a blanket that she bought inexpensively and did stitch work on. It was thoughtful and unique!

Quilt – You don’t need to necessarily buy quilt material, but you can if you want. Choose several types of fabric that you like and cut them into squares all the same size. Next, sew them all together. Buy another piece of fabric and sew it onto the quilted part of the blanket.

Lovely Soap

I come from a very large family and some of my fondest memories are from the holidays when we would all work together to make presents for extended family members. One of my favorite things to make and give away was soap and other DIY beauty gifts.

The great thing about soap is that it’s practical and customizable. This is an easy soap recipe. (You can make your own from scratch with this recipe from www.thefarm.org) Here’s what you need — You can find all these items at your local craft store.

– Soap Block (available at your local craftstore)
– Soap Molds
– Scented oils (your choice)
– Other items for your soap (eg. Lavender, oatmeal, almonds, cinnamon, chocolate, etc.)

There are step by step instructions on the soap blocks and it’s very difficult to mess up. Melt your soap blocks, add scents and ingredients of your choice and let it sit in greased soap molds until hardened. Remove and place in pretty packages or gift baskets!

* Also get some wonderful ideas for soap from this Miseducated article.

Scrumptious Chocolate Covered Strawberries

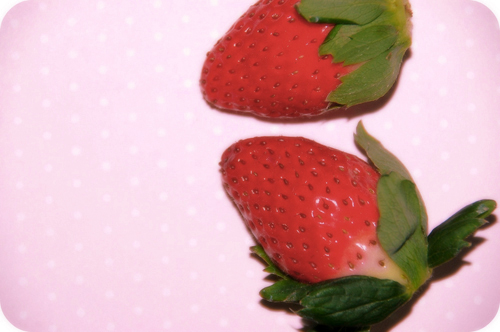
First, buy about 5-15 healthy-looking strawberries. When you get home, make sure there aren’t any bad spots (if there are simply cut them away). Choose the prettiest ones and keep the green leaves on top – they look more beautiful that way.

While you’re at the grocery store, pick up some dip-able white chocolate. You can usually find this in the crafts section or near the produce. Also pick up some red food dye.

Melt your chocolate in the microwave in bursts of 15-20 seconds. It doesn’t take long to melt the chocolate so be sure to keep an eye on it.

Set aside some of the white chocolate and then add 2-3 drops of the red food dye to the remaining white chocolate. Dip your washed strawberries into the pink chocolate and place on wax paper. Next, dip the bottom part of a spoon/fork into the white chocolate and drizzle on top of your pink strawberry to add a decorative effect. Place in the refrigerator until they are cooled.

You can mix up the chocolate colors (ie. White dipped, pink drizzle; dark dipped, white drizzle) and place the strawberries in a sweet box. Add a ribbon and a card!
DIY Recipes

Sensational Seaweed and Beauty Recipes

03/05/2009

Seaweed is one of the healthiest things out there and it can do wonders for your hair, skin, nails and body. You can often find seaweed in the exotic food section of your grocery store or seaweed products (ie. Kelp, dulse, nori, sea lettuce) at a health food store/online. The following are great DIY beauty recipes that you can prepare and use in the comfort of your own home.

seaweed

Seaweed Detox Wrap

This recipe cleanses your body of all unnecessary that build up by simply walking around. It also relieves stress, slims and is a lovely treat after a long day at work. Here’s what you need:

8 ounces powdered seaweed (kelp is easiest to find)
1 cup hot warm water
2 plastic sheets (saran wrap works well).

Before you begin, prepare your bathroom for the wrap treatment. I like to lay a blanket down in the bathtub, light a few candles and let hot water run for a while to get that steamy effect (if you run water in the bathtub, lay the blankets down afterward obviously). I’ve also heard of people putting space heaters in the bathroom to keep it warm.

Next, set your plastic sheets out (or sarah wrap) so that it’s ready to go. To prepare the seaweed past, simply pore the powdered seaweed of choice into a medium sized bowl. Next, add a little bit of a water at a time and stir. Do this until you have reached a consistency that is not too thick but still applicable and will stick to your skin.

Apply the mixture to different areas of your body, such as your stomach, arms, legs, feet. Wrap with the plastic sheet or saran wrap and sit in the bathtub under a second blanket. Listen to soothing music or sip on tea for 20 minutes. Next, remove the plastic wrap and soak in the bathtub for 10 minutes or so and rinse all the residue away. Apply lotion as desired and relax for a little while longer.

Lavender and Seaweed Bath Tea

I love this recipe because you can make it in bulk and it serves as the perfect gift. Here’s what you need:

Tea bags (or tea filters)
1/2 cup dried seaweed (kelp, seaweed flakes, nori)
1 cup dried lavender

Once you’ve gathered the ingredients, mix the seaweed and lavender until you have an even mixture. Next, divide the mixture up into the tea bags and tie (you may need to purchase string depending on the types of tea bags you purchase). Draw yourself a warm bath, light some candles and drop 2 tea bags into the water. After letting it steep for 5 minutes, hop in and enjoy!

Note: If you can’t find teabags in the tea section or your local craft store, try using pantyhose.

DIY

Kao-Ani Club: Pixel Your Own!

01/30/2009

What is a kao-ani?
An animated face, it’s a cute Japanese emoticon.

How can I make one?
There’s a great tutorial here at this kao-ani fansite, if you’re just getting started!

What about more pixeling techniques?
Check this out for more information about pixeling and great tutorials. It’s a fun hobby to get lost in.

How can I animate my pixels?
Adobe Photoshop CS+ by using layers, it’s easy! How?

Rules

1. Create kao-ani that represents you :3
2. Swap with others, link kaos back to owners so swappers may explore through other kao member pages and swap with new friends.
3. Link back here wherever you decide to show off your kaos so that others may join, too!

Member Kaos

These kaos were left here by the members that created them~

amber renee's kao kimi/luna daisy's kao kimi/luna daisy's kao
DIY Recipes

Citrus Spa Recipes for Your Skin

01/20/2009

Citrus has wonderful affects when applied topically. That’s why fruits like lemons, grapefruits, limes, oranges, etc. are often seen in DIY beauty recipes. Citrus has naturally detoxifying effects when applied to the skin and it also serves as an astringent/toner and antiseptic. The following are three original and delicious DIY Beauty recipes that incorporate citrus*y fruits into the ingredients!

citrus

Grapefruit Toning Facial Mask

This recipe is especially great for those with oily/combination skin. The citrus juices from the grapefruit exfoliates and eliminates extra oil that may accrue over the days time. Oh, and it smells great, too! Here’s what you need to gather:

1 tsp. Grapefruit juice
2 teaspoons honey
6 ounces plain yogurt
8-10 almonds
1 tablespoon rice

Once you’ve got everything together, combine the ingredients in a blender. Blend on high for 1-2 minutes. If you notice that there are large chunks of almonds left then blend again. It may help to crush the almonds pre-blending!

Wash your face with your normal cleanser and pat dry. Apply a generous amount of the mixture to your face and spread it evenly. Let it sit for 15-20 minutes or until it has hardened. Rinse with warm water. Make sure you remove everything – you don’t want yogurt residue on your face! Splash your face with cold water to tighten pores and then gently pat dry.

Cream Cheese / Orange Facial Spread

I love this recipe because if you have any left over it makes a perfect spread for a toasted bagel! It’s a refreshing, creamy blend of goodness that does wonders to your face. Here’s what you need:

1 small-medium sized orange
½ teaspoon lemon juice
1 tsp. honey
2 ounces cream cheese (soft)

In a small to medium sized bowl, combine your cream cheese and honey. Blend thoroughly so that the honey is evening dispersed throughout the cream cheese.

Next, cut your lemon in have and squeeze out ½ teaspoon of juice. Be careful of the seeds! Peel your orange so that you are left with a skinless fruit! Take 2 slices of the orange (you can peel them apart easily) and take off the thin layer of “skin.” Add the lemon juice and peeled orange slices to your cream cheese and mix/mash until you have a smooth and consistent texture.

Your spread is now ready to spread! Apply a thin layer of the concoction to your face and let it set for 15 minutes until it is hardened. Rinse with warm water. Follow up with a few cold splashes (to tighten pores) and gently pat dry!

Pineapple Papaya Acne Treatment

Again, this one is good enough to devour! Papaya is a powerhouse of nutrients and enzymes that work to heal the skin. It does wonders for acne-prone skin. The citrus*y pineapple is a gentle exfoliator and the honey/yogurt work together to moisturize. Round up these ingredients before you begin:

1 cup fresh pineapple (avoid cans)
¼ cup fresh papaya
2 grapes
½ tablespoon honey
1 tablespoon yogurt

After you’ve prepared your pineapple and papaya, take 2 grapes and peel the skin off. In a small to medium sized bowl, mix all of your fruits together, mashing them well so that you have an evenly combined mixture of delicious looking fruit. Try to not to eat any!

Next add to your bowl the honey and yogurt. Mix well and let it set for 10 minutes in the refrigerator. This gives the papaya and pineapple juices time to seep into the mixture.

While you’re waiting, cleanse your face with your normal face wash and pat dry. Next, apply the mixture to your face focusing on those areas where acne is most troublesome (T-zone, chin, etc). Let the mixture set on your face for 20 minutes. Rinse with warm water and gently pat dry. This also works well on other acne-prone parts of your body.

Crafts DIY

Cute as a Button Earrings You Can Make

01/13/2009

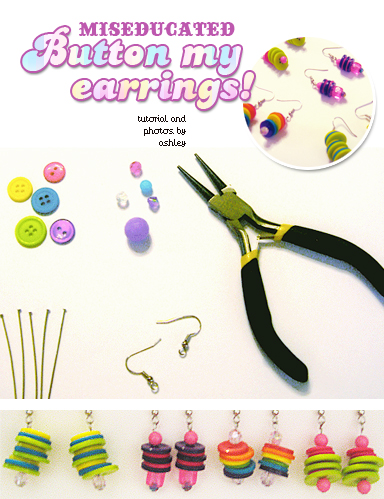
Most of us have seen button stud earrings, and maybe even the cluster button earrings. Either way, here’s a new twist on the popular trend. I call them Swivel Stacked Button Earrings. They are extremely easy to make, and can be done using all kinds of variations, colors, and different kinds of beads.

button my earrings

What you’ll need

Flat Headpins (preferably the long ones)
Buttons in assorted colors and sizes (you could also experiment with different shapes for unique looks)
Various beads (small ones are used to keep buttons on headpin, while others can be used for decorative purposes)
French Hook Earrings
Wire Trimmers
Needle Nose Pliers

Step 1

Since most buttons have too large of a whole, you’ll need to first put a small bead on the headpin to keep buttons from sliding off.

Step 2

Take your buttons and put them on in any order you want. You can vary from size or colors depending on the look you want. At this point, you can also add various beads if you choose.

Step 3

Once you’ve got your earrings looking the way you want, it’s time to attach the headpin to a French hook earring. Assuming you have quite a bit of length left on your headpin, this is where you can trim off any excess. Be sure to leave enough length to make a loop to attach your earring hook. Now you will use your needle nose pliers to loop the excess of the pin (like a jump ring) so the earring hook is attached. Make sure you close your loop tight enough so they don’t slip off your earrings.

If all went well, you should now have a funky pair of dangling earrings!

Crafts DIY

Sew a Blythe Doll Skirt in Minutes

12/20/2008

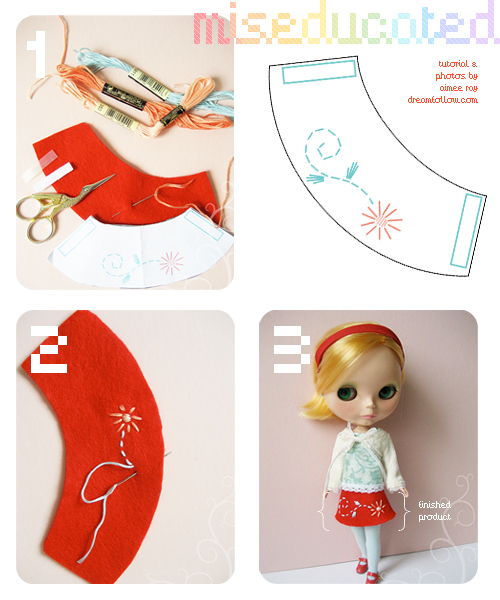
It’s super easy to sew a simple felt skirt for your Blythe! This is an easy pattern to try, even if you’ve never sewn or embroidered before. Feel free to download a PDF of the printable pattern here.

DIY Blythe Skirt

You Need

1 piece of felt, approximately 6×4 inches
Embroidery floss in 2-3 colors
Small piece of velcro
Needle
Scissors

Step 1

Print and cut out the skirt pattern, use it to cut a piece of felt the same shape.

Step 2

Embroider a design. Even if you’ve never embroidered before, you can
easily make a pretty design with variations on just one simple stitch. Thread your needle, tie a knot in one end and pull the floss through from the backside. Put your needle back down through the felt again, there you have a Straight stitch! You can trace the flower design onto your skirt with fabric transfer paper, but you might find it easier to just stitch it up freehand. The flower is several Straight stitches in a circle, the center of the flower is Satin stitch, several Straight stitches side by side. For the
vine, make several small Straight stitches in a line, one after the other. This is called a Running stitch.

Step 3

Sew one side of the velcro to each end of the skirt, one on the front and one on the back. Dress up your dolly in your cute new creation!

DIY Recipes

Recipes for Berry Beauty Regimens

12/16/2008

Berries are a practical natural source for all sorts of things. For example, most are wonderful treats for your taste buds, many are used to create colors for natural fabric dying and they are also great to apply topically to your body and face!

And who could dismiss the fact that berries make things taste and smell oh-so-sweet! With that said, here are a few recipes that incorporate berries into the ingredient list. These are some of my favorite recipes to date!

berry lovely

Blueberry Honey Lipgloss

Mmm! What a delicious treat for your lips! I don’t know about you, but I’m up for some all-natural blueberry and honey flavored gloss any day! This recipe is great because the deep purple of the blueberries add a light pink tint to your lips and the honey adds softness. What you need:

8-12 fresh blueberries
1 tablespoon of extra virgin olive oil
1 tsp. honey (try organic!)
1 capsule of Vitamin E (optional).

Once you’ve gathered your items, wash your blueberries and choose 8-12 average sized berries that look the healthiest! Next, combine the honey and oil in your microwave safe bowl. Make sure that it is mixed well. Extra virgin olive oil is very refined oil and great for your lips, but if you find the scent too strong you can trade it out for a vegetable oil of your taste.

After the honey and oil are mixed thoroughly, add your blueberries and heat in the microwave. Keep a close eye on the contents while they are heating. About ever 20-30 seconds, take the bowl out and stir. Continue to do this until the mixture begins to boil.

With a spoon, crush the berries.. The liquid portion of the mixture should turn to a pinkish color. Continue to mix until the berries are fully crushed. Remove what is left of your berries either by straining or by picking them out. Stir until everything is smooth and consistent.

You can store this fabulous gloss in an already-used lip gloss container or purchase a container at a craft store. Cool, huh?

Strawberry Cream Rouge

I’m totally obsessed with this recipe! Not only are DIY blush recipes hard to come by, but this one looks fabulous, moisturizes your face and is super easy to make. You’ll be shocked into happiness with this baby! Before you begin, gather these items:

2-4 strawberries (you’ll want 1/2 cup chopped)
1/4 cup of beet powder
1/2 teaspoon of extra virgin olive oil

First, select 2-4 strawberries that look the healthiest! Wash them and cut off any blemishes. Gently dry them off and chop into small pieces. You should have 1/2cups worth. Next, combine the strawberries with the beet powder and olive oil in a blender. Blend on medium until everything is smooth and consistent.

You can store this creamy blush in an already-used container or you may purchase one from a craft store. To apply, dab a small amount on the apples of your cheek and blend in. You’ll be a glowing, strawberry-lovin’ diva!

So Berry Bright Mask

The scents from this face mask will leave your mouth watering. Feel free to drink a glass of champagne with this recipe! Here’s the ingredient list:

1/2 cup almonds
1/2 medium sized cucumber
3 strawberries
1 tsp. honey
1 tsp. plain yogurt

Combine all the ingredients into a blender and blend on medium setting for 2-3 minutes. Depending on your blender you may need to blend a bit longer. Make sure that the mixture relatively smooth and consistent (the almonds will make it a bit rough, though).

Cleanse your face with your normal face wash and pat dry. Apply this mixture to your face and let it set for 10-15 minutes (or until it is dry). Once you’re ready to rinse, do so with warm water. Splash cool water on your face to tighten pores and then gently pat dry. Take a look in the mirror – that’s one berry fabulous chic!

DIY Recipes

Rainbow Gelatin Cake Recipe

12/15/2008

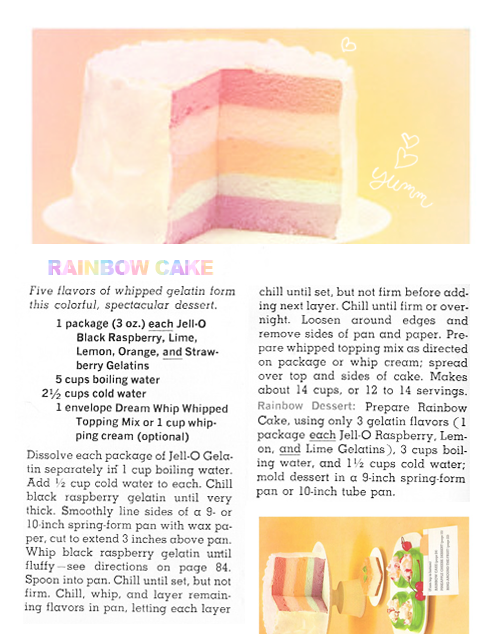
Creamy, delicious color topped with color upon color, reach the moon if you must! This cake is absolute fantasy land in a kitchen. If you take the rainbow challenge, please show us how it goes! The only thing better than eating rainbows is gazing upon them~

Rainbow Jello Cake

Feel free to print this for your recipe book/box and keep it close by for celebrations of the colorful sort.

DIY

Take the Pledge to Buy Handmade

12/08/2008

To learn a new recipe or diy project, just explore around the DIY pages of Miseducated and within the links section above for some of our favorites!

I’m sure many of you crafty girls have your own shops so please post your shops and urls here! If you have your own idea for a project you’d love to share, simply email us at [email protected] as always! We love to hear from you.

Why buy handmade?

Buying Handmade makes for better gift-giving.
The giver of a handmade gift has avoided the parking lots and long lines of the big chain stores in favor of something more meaningful. If the giver has purchased the gift, s/he feels the satisfaction of supporting an artist or crafter directly. The recipient of the handmade gift receives something that is one-of-a-kind, and made with care and attention that can
be seen and touched. It is the result of skill and craftsmanship that is absent in the world of large-scale manufacturing.

Buying handmade is better for people.
The ascendancy of chain store culture and global manufacturing has left us dressing, furnishing, and decorating alike. We are encouraged to be consumers, not producers, of our own culture. Our ties to the local and human sources of our goods have been lost. Buying handmade helps us reconnect.

Buying handmade is better for the environment.
The accumulating environmental effects of mass production are a major cause of global warming and the poisoning of our air, water and soil. Every item you make or purchase from a small-scale independent artist or crafter strikes a small blow to the forces of mass production.

Learn more and take the pledge at http://www.buyhandmade.org