Browsing Category

Crafts

Crafts DIY

How to Create the Perfect Polymer Macarons

03/25/2009

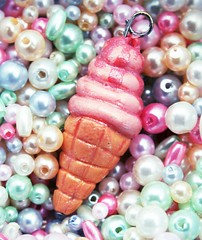
I believe many girls love macarons. Tell me who can resist the delicious and cute looking French macaron?

macaron diy

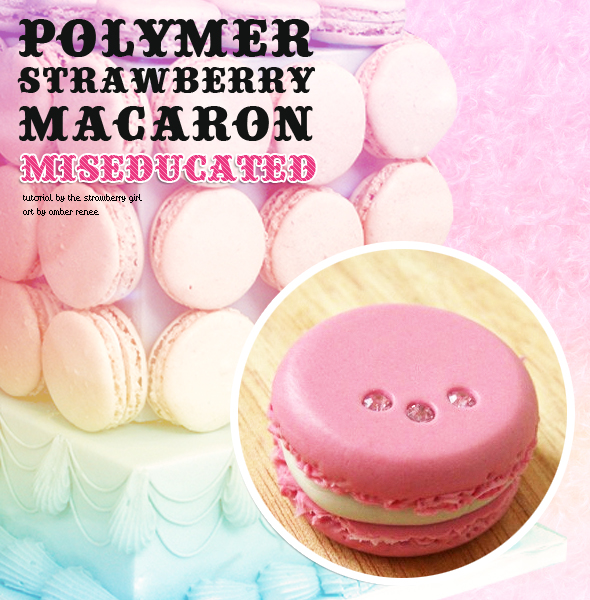
Besides the edible macaron, macaron accessories are also very popular in Japan and all around the world. There are may ways to make macaron accessories for yourself or for your little Blythe. The simplest way is to use air dry clay or polymer clay. In this tutorial, I choose to use air dry clay because I don’t like to use polymer clay that has to be cured in the oven.

macaron diy

You Need

Acrylic paint (any colour you prefer)
Clay cutter and measurement spoon (size is up to you)
9-pin
Embedded crystals (any colour you prefer)
Vaseline Petroleum Jelly or hand lotion
Air dry clay (you can use polymer clay which needed heat up in oven to cure)

Steps

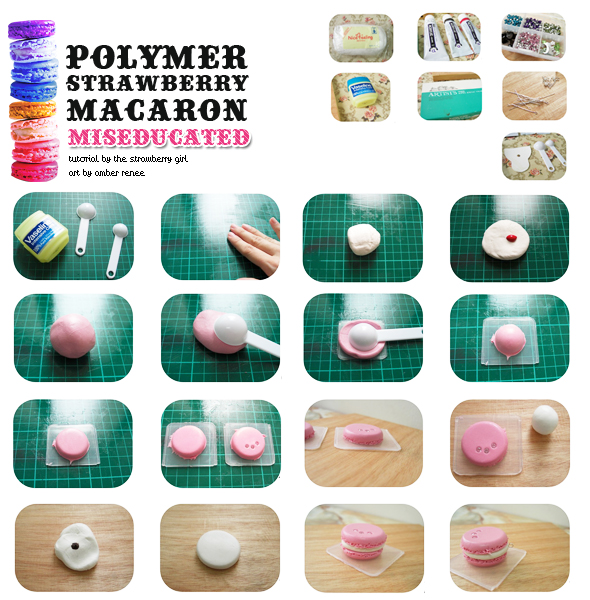
1. Apply the Vaseline (or hand lotion) on the tools and surface that will contact with the clay. This step is important to avoid the clay stick at the tools or surface.
2. Apply the Vaseline on the surface and your hands too.
3. Cut this amount of clay (enough to make two macarons).
4. Put a little red acrylic paint on top of the clay (I chose red because I want to make a pink macaron).
5. Twist and rub the clay until the colours mixed evenly with the clay.
6. Then put the measurement spoon on top of the clay.
7. Press down so to get a shape alike the shape of the measurement spoon
8. Please see if it looks like the photograph above.
9 Then use any flat surface to press it down until it looks like this.
10. Repeat the step 6 to 9 for the bottom piece. Some embedded crystals are put on top of the top piece.
11. As shown in this picture.
12. Cut this amount of clay.
13. Put a little bit dark brown acrylic paint on top of the clay (to add some colour to the filling) then twist and rub the clay until the colour mixed evenly with the clay.
14. Then use any flat surface to press it down until it looks like this.
15. Sandwich the white clay in between the top and bottom pieces of pink macaron.
16. If you want to make accessories with it, you have to add a 9-pin. Enter the 9-pin from the side.
17. Set aside the clay macaron for two days for completely air dry.

Tips

1. I recommend you to trim your nails first before handling the clay, because clay tends to stick to long nails.
2. Make sure all the tools and surface are dust free to avoid any dust twisted or rubbed into the clay.
3. In case the clay become dry, add a few drop of water to get back the flexible feeling.

Crafts DIY

Inexpensive Do-It-Yourself Gifts

03/09/2009

This whole economic downturn has left a lot of the country in a sorry mess, but I’m not here to wallow in financial troubles. No way! I view the scarcity of cash as a wonderful excuse to get crafty! And it’s always more fun to craft for someone else which is what inspired me to create this article.

These gifts are easy to make and inexpensive, to boot! You can make them for a loved one “just because” or give it away for a special holiday. The choice is yours.

diy gifts

Hearty Bread and Jam

For you domestic creatures out there, put your skills to use! Everyone loves an edible gift, especially if it’s made by you! Jam/Jelly is a very easy item to make, it just takes a little bit longer than some foods. Bread and jam come in a variety of forms, so choose the best one for your recipient.

Cozy Blanket

Blankets are also very customizable, making them an ideal gift for any time of the year. Try these different types of blankets:

Crocheted – Choose your recipients favorite colors and have at it! They’ll be thrilled with the amount of time and effort you put into their present.

Tied – Buy two different types of fabric that complement each other. Make sure that you get a big enough size that it serves as a blanket. Both fabrics should be the same size. Next, spread the two fabrics on the floor (one on top of another) and cut around the edge. Each cut should be 2-4 inches deep. Next, tie the two fabrics together (double knot). Do this all around the edge of the blankets. Viola!

Customize – (an already made blanket) One of my favorite gifts from a friend was a blanket that she bought inexpensively and did stitch work on. It was thoughtful and unique!

Quilt – You don’t need to necessarily buy quilt material, but you can if you want. Choose several types of fabric that you like and cut them into squares all the same size. Next, sew them all together. Buy another piece of fabric and sew it onto the quilted part of the blanket.

Lovely Soap

I come from a very large family and some of my fondest memories are from the holidays when we would all work together to make presents for extended family members. One of my favorite things to make and give away was soap and other DIY beauty gifts.

The great thing about soap is that it’s practical and customizable. This is an easy soap recipe. (You can make your own from scratch with this recipe from www.thefarm.org) Here’s what you need — You can find all these items at your local craft store.

– Soap Block (available at your local craftstore)
– Soap Molds
– Scented oils (your choice)
– Other items for your soap (eg. Lavender, oatmeal, almonds, cinnamon, chocolate, etc.)

There are step by step instructions on the soap blocks and it’s very difficult to mess up. Melt your soap blocks, add scents and ingredients of your choice and let it sit in greased soap molds until hardened. Remove and place in pretty packages or gift baskets!

* Also get some wonderful ideas for soap from this Miseducated article.

Scrumptious Chocolate Covered Strawberries

First, buy about 5-15 healthy-looking strawberries. When you get home, make sure there aren’t any bad spots (if there are simply cut them away). Choose the prettiest ones and keep the green leaves on top – they look more beautiful that way.

While you’re at the grocery store, pick up some dip-able white chocolate. You can usually find this in the crafts section or near the produce. Also pick up some red food dye.

Melt your chocolate in the microwave in bursts of 15-20 seconds. It doesn’t take long to melt the chocolate so be sure to keep an eye on it.

Set aside some of the white chocolate and then add 2-3 drops of the red food dye to the remaining white chocolate. Dip your washed strawberries into the pink chocolate and place on wax paper. Next, dip the bottom part of a spoon/fork into the white chocolate and drizzle on top of your pink strawberry to add a decorative effect. Place in the refrigerator until they are cooled.

You can mix up the chocolate colors (ie. White dipped, pink drizzle; dark dipped, white drizzle) and place the strawberries in a sweet box. Add a ribbon and a card!

Crafts DIY

Cute as a Button Earrings You Can Make

01/13/2009

Most of us have seen button stud earrings, and maybe even the cluster button earrings. Either way, here’s a new twist on the popular trend. I call them Swivel Stacked Button Earrings. They are extremely easy to make, and can be done using all kinds of variations, colors, and different kinds of beads.

button my earrings

What you’ll need

Flat Headpins (preferably the long ones)
Buttons in assorted colors and sizes (you could also experiment with different shapes for unique looks)
Various beads (small ones are used to keep buttons on headpin, while others can be used for decorative purposes)
French Hook Earrings
Wire Trimmers
Needle Nose Pliers

Step 1

Since most buttons have too large of a whole, you’ll need to first put a small bead on the headpin to keep buttons from sliding off.

Step 2

Take your buttons and put them on in any order you want. You can vary from size or colors depending on the look you want. At this point, you can also add various beads if you choose.

Step 3

Once you’ve got your earrings looking the way you want, it’s time to attach the headpin to a French hook earring. Assuming you have quite a bit of length left on your headpin, this is where you can trim off any excess. Be sure to leave enough length to make a loop to attach your earring hook. Now you will use your needle nose pliers to loop the excess of the pin (like a jump ring) so the earring hook is attached. Make sure you close your loop tight enough so they don’t slip off your earrings.

If all went well, you should now have a funky pair of dangling earrings!

Crafts DIY

Sew a Blythe Doll Skirt in Minutes

12/20/2008

It’s super easy to sew a simple felt skirt for your Blythe! This is an easy pattern to try, even if you’ve never sewn or embroidered before. Feel free to download a PDF of the printable pattern here.

DIY Blythe Skirt

You Need

1 piece of felt, approximately 6×4 inches
Embroidery floss in 2-3 colors
Small piece of velcro
Needle
Scissors

Step 1

Print and cut out the skirt pattern, use it to cut a piece of felt the same shape.

Step 2

Embroider a design. Even if you’ve never embroidered before, you can
easily make a pretty design with variations on just one simple stitch. Thread your needle, tie a knot in one end and pull the floss through from the backside. Put your needle back down through the felt again, there you have a Straight stitch! You can trace the flower design onto your skirt with fabric transfer paper, but you might find it easier to just stitch it up freehand. The flower is several Straight stitches in a circle, the center of the flower is Satin stitch, several Straight stitches side by side. For the
vine, make several small Straight stitches in a line, one after the other. This is called a Running stitch.

Step 3

Sew one side of the velcro to each end of the skirt, one on the front and one on the back. Dress up your dolly in your cute new creation!

Crafts DIY

Do-it Yourself Holiday Gifts

11/14/2008

If you can’t find me on any given Saturday afternoon, I’m likely perusing the aisles at my local flea market or antique store. You see, since I was a wee thing, I’ve been obsessed with all things old and lovely. And what better place to find “old and lovely” than at a store that sells items of the past?

Remember, the difference between flea markets and antique stores is this: Antique stores have done the dirty work for you and have found the best of the best vintage doo-dads. As a result, their prices are higher. Flea markets, on the other hand, are a composite pile junk-things and fabulous finds. Consequently, the prices are much lower.

With that said, I find pleasure in both types of stores. However, I personally feel that flea market browsing is a much more satisfying experience. It’s like I’m a superwoman saving all these beautiful items hidden among the rubble! If flea markets are the way you want to go, keep in mind that it takes patience and a lot of time to have a successful shopping trip.

Now, without further ado, here are a few unique ideas that are half DIY, half vintage-fab. And I promise, they are oh-so-easy to do!

The Candy Dish

I promise that any flea market/thrift store/antique mall will have myriad exquisite dishes. In fact, these items are one of my most favorite to look for, simply because they are easy to find and almost always affordable and different. The best candy dish finds are the ones that have a lid (helps keep the candy fresh!) and are one-of-a-kind. For example, I once purchased a fabulously decadent, blue-glass dish that floated on a stem. Once you find the perfect dish that fits the receivers personality, add some of their favorite candy! Individually wrapped chocolates are always a hit!

Framed Vintage

You can frame pretty much anything you want, but one of my favorites is either sheet music or old magazine ads. These items are usually very inexpensive ($1-$5 on average) and offer a great variety of styles. Just browse through the selection and set aside the items that speak to you. Now that you’ve got your item, all you need to do is frame it. Depending on the recipient and the item to be framed, I like to purchase a modern-looking frame to offset the vintage look or purchase an older frame to drive the point home!

Tip If you can’t bring yourself to tear a page out of a magazine, simply make a color-copy!

The Vase

Vases are another easy find at any thrift store, flea market or antique mall. And just like the candy dishes, there is often a great variety in style and color. I am often drawn to opulant items and so for me, the fancier the better! Since you are purchasing for someone else, try to find a vase that reflects the personality of whoever is receiving the gift.

Once you’ve purchased the vase, head to your local flower shop with the vase (clean it up first, of course!). Ask the shop owner which flowers would look best in the vase and go from there.

Tip You don’t have to buy a large bouquet. A few flowers in a beautiful vase makes a bold statement.

Cookie Jar Frenzy

Who doesn’t love cookies? And if you have cookies, why not store them in a beautiful cookie jar? On your next vintage-outing, search high and low for some interesting jars. I’ve seen plenty in my day, ranging from refined and exquisite to gaudy and fun!
Once you have your jar purchased, clean it out and make a batch of the recipients favorite cookies.

Tip To add more vintage snazz to this gift, put the recipe for the cookies on a vintage inspired (or actual vintage) recipe card and include it with the gift!

Sweet Tea Cup

This is one of my favorites. All you have to do is find a lovely tea cup and saucer set. These are usually priced quite low – anywhere from $4 to $25. After you find the cup and saucer of your dreams, purchase some nice tea bags and a few honey sticks. Put said items in your tea cup and wrap the cup/saucer in tinted (or clear) cellophane. You can usually find cellophane at craft stores (I know Target sells some, too). I like to add a ribbon bow at the top for an extra touch of pretty.

Crafts DIY

Easy, Colorful Jewelry and Plasticandy Bracelets

11/10/2008

I guarantee if you enjoy making cute, simple items this has been or will become your new favorite hobby. Preferably when drinking, relaxing, listening to records grab out your big bowl of pony beads and plastic jewelry bits. Grab some elastic cord, elastic string, invisible elastic, etc~ make sure it’s stretchy and not annoying to work with. Go to a craft shop and look in the bead/jewelry section to find a selection of elastic cord. Double stringing the bracelets is also a great idea if you’re rough on your jewelry!

starbrights plasticone

Next, pick out a color scheme or shapes you like and string the beads onto the double cord. When the beads are on the cord long enough that you can easily wrap it around your wrist with no spaces between beads, Tie it. Tie it very secure and then dab a drop of clear nail polish or super glue on the knot and let it dry.

After it’s dry put the bracelet on or give it to a friend (ideal). Deck your arms out in your best ones when you’re going out to a fun club, party or rave for the night and hand out bracelets to friends and people you meet. You’ll find that when you go out and have fun you’ll usually come home with one or no bracelets. Now it’s time to make more!