Browsing Category

Crafts

Crafts DIY

Decorate and Upcycle Your Shoes Sweetly

11/19/2009

This is a pair of old shoes I had lying around.. I felt they were a bit boring so I rarely wear them. hehe… I think a lot of people have a similar problem, there are always something we don’t want to wear / use, but we are reluctant to throw it away or be wasteful. It is a good idea to give them a new birth with alterations and decoration!

All we need to snazz up these shoes is some lace, two heart-shape cabochons, and some pearls.

w205583419 w205583429
w205583413

1.

First, wrap the heart-shape cabochons with some lace and sew it tight at the back.

w205583407

2.

Then, string up the pearls and sew them around the cabochons.

w205583406

3.

Sew some pearls on the ribbon (or shoe!) randomly.

w205583387

4.

Finally, stick the cabochons on the ribbon.

w205583436 w205583378

5.

DONE!

Crafts DIY

Recycle your Vintage Scarf into a Necklace

10/29/2009

This is a style that I wear all the time and it’s easy easy to make. I’ve loved vintage scarves but for ages I was stumped as to how to wear them without looking like the queen! Finally a brainwave brought me to the knotted scarf necklace …

You will need a patterned scarf of square of fabric, about 30″ (76cm) x 30″ to start!

scarf

1. Lay your scarf flat, pattern side down.
2. Fold it in half, so the patterned side is on the outside.
3. Start rolling from the corner …
4. … Until you have a long sausage.
5. Tie three knots – one in the centre, and two either side.
6. Finally, tie at the top, and there you have your necklace.

I’ve used a green paisley scarf for this one, but it works with any pattern, or even a plain silk scarf. I especially love it in a nautical or equestrian print.

I think I’m Miseducated because I don’t wait for beautiful things to come to me, if I have something pictured in my mind, I’ll try and make it. Sometimes I succeed, sometimes I fail but it’s all worth it when you get complimented on your outfit and you can say ‘I made it myself!’

Crafts DIY

Create your own Nail Art

10/13/2009

Fingernails.. Toenails.. they’re like mini canvases waiting to be painted (or collaged!). I used to have such a love for nail art that I devoted an entire website to it, complete with fanlisting! The fanlist grew large, the discussion about Japanese fashion, makeup and nail art was booming.

Now thanks to the rad Japanese fashion magazines people scan and share and Gwen Stefani, Japan fashion is even more prevalent today. (yay!)

Japan has a hand up in life design.
Design is a process that we can take to every level.
Let’s not ignore our nails! ๐Ÿ˜‰

So how will we get this decadent inspiration without scanning bookstores for Japanese fashion magazines and nail salon listings? Here of course!

Below are some cute nail tips and tutorials from Japan, I’m absolutely digging on the strawberries.

No matter what you decide~ enjoy life to the fullest while you design your world.

Nail art scans are from Japanese fashion magazines such as ecocolo, CUTiE, CUTiE Book, melon, egg, Kera, BLENDA, JILLE, ku:nel, Nail Up, etc and, my favorite nail salon, PinkyNail.

Crafts DIY

Decadently Decorate your Camera

09/30/2009
w194587369

Once I saw the milk chocolate camera on Fuji’s official website, I knew I had to decorate it with sweets and delicious desserts as much as I could! haha

w203001227

Here I bought some very cute plastic sweets (cabochons) from shops at Yu Chau Street in Hong Kong. The street is very popular for its accessory shops. You can find a broad variety of components with different styles, which can be used in DIY (such as earrings, brooches, etc.) or to customize anything you like!

WOW… yummy!!!

w203001225

This is my nude camera and the components.

w203001228

Finally I squeezed all the sweets and cream on it! haha!!!! Love it so much! ๐Ÿ˜€

My boyfriend nearly cried after seeing the new look of the camera (that HE had bought me). He thinks it is to abnormal for one to carry such a cluttered, exaggerated camera to take photos. hehe.. but then I read the information about Miseducated, “Be who you are and say what you feel, because those who mind donโ€™t matter and those who matter donโ€™t mind.โ€ โ€“ Dr. Seuss, hoho! That’s right! I know my boyfriend really doesn’t mind my crazy works. It’s really important for us to be who we are or else we will lose our own personalities and the ability to imagine and create new things! ๐Ÿ˜€

Crafts DIY

Create an Owl to be your Pal

09/24/2009

So you want to create a ‘fuggly’ owl to be your pal? Though yours doesn’t have to be fuggly, that’s just the way I sew! (hehe)

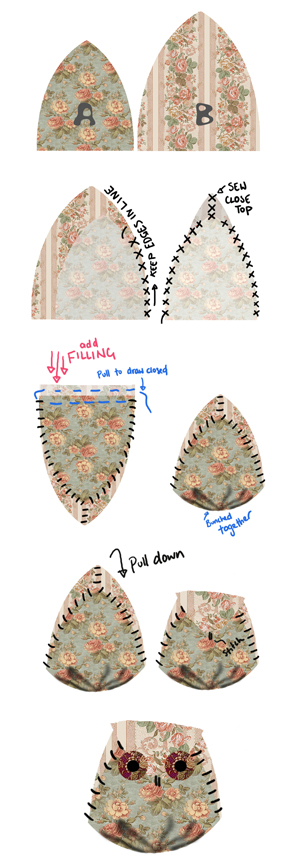
1. Cut out two triangles (one small one, one bigger one) with slightly curved edges as seen.

note: it’s not an exact science, so you may like to experiment with longer, shorter, wider, thinner, curvier triangles.

2. Face the fabric inwards and sew up one side. As you sew, pull the two fabric edges so that they are together. There will be a gap where the ‘A’ triangle ends. Continue sewing up along the side of B triangle, then back down along the other side.

3. Sew around the bottom opening so that you can pull on the thread and draw the bottom closed like a drawstring bag. Fill it with filling and pull the bottom closed.

note: I use grain but wool or polyester stuffing is also good. Do not fill it up too much!

4. Fold the top down and secure it. This makes the beak.

note: This is why you don’t want to fill it too much because you wont be able to pull the beak far down, though some people like very small beaks. If so then fill it up lots!

5. Add eyes.

note: Beads work well. Fabric has a tendency to fray when cut too small. Don’t learn this the hard way!

Crafts DIY

Create and Flavor Your Own Lipgloss

05/06/2009

Miseducated girls like to stand out in a crowd. Which is precisely why this make-it-yourself, fully customizable lip gloss recipe is perfect. (Not to mention, Miseducated-mavens always have pretty puckers).

Read through this super easy recipe and then feel free to add whatever your heart desires (within reason, of course!) to make your very own lip gloss.

creating lipgloss

You Need

Option 1 (the extra-easy route)
Have you ever applied Vaseline to your lips? Well whether you have or haven’t, it’s a great moisturizer for your puckers. If you prefer to take the easy route (which is great when you’re in a bind), can use this as your base and then customize the rest.

Option 2
Take 1 tablespoon of beeswax and place it in a clean glass jar. Place the jar in very hot water. Be careful not to get water in it as the two don’t mix well. With a toothpick or stick-like device, stir until you see that the wax has softened.

Next, add a tablespoon of almond oil. Mix thoroughly. If you want, you can add a capsule of Vitamin E which preserves your gloss for a longer amount of time and also adds nutrients. Another option is to add ยฝ a teaspoon of honey. This makes it a little sweeter and also adds nutrients.

If you’re a simple lassie then you can stop here. If you’re in the mood to customize, here are a few ideas to give a go:

Customize your Gloss

Fresh and Fruity
Add a few berries to your mixture while it’s hot. Crush the berries and pick out the skin or strain it. Some great berries to try are cranberries (which create a lovely shade of dark pink) or blueberries which create a pinky-tone. [Check out my Berry Beauty article which has a great Blueberry Honey gloss].

Mighty Mint
Add a few drops of peppermint or spearmint oil, mix it up and you’re set to go! Refreshing!

Cola Queen
Add a few drops of your favorite cola (try Sprite or Orange!) and mix thoroughly. Yum!

Charming Chocolate
You can either purchase chocolate scented oil or melt a little piece of chocolate with your beeswax. Guaranteed to melt on your lips! That’s a good thing.

Whimsical Flowers
Feeling romantic and whimsy? Try a little jasmine, rose or lavender oil!

Brewed Beer Gloss
That’s right! Infuse your lips with the scent of beer! Just add a few drops of your favorite brew and mix it up.

Lemon Lady
If citrus is your thing, squeeze a bit o’ lemon, lime or orange juice into your beeswax and mix thoroughly. Zing!

These are just a few ideas. Let your mind go free and you’re sure to come up with even better customizations!

*Make this gloss in small doses as it does not last forever. Store it in your fridge at night to make it last longer. Oh, and if you want to bring it out with you (a total “do”), store it in a recycled lip gloss container or even a fabulous little pill box!

Crafts DIY

Create Your Own Mosaic Frame

04/14/2009

Before you begin

Choose boxes or frames “unfinished”; paint them with acrylic paint gold or silver (or whatever color you want, depending on your color scheme) just to have a base for the tiles to stick to. I don’t like to show raw wood between tiles because I don’t use grout in between the tiles (too messy and may scratch). Paint back and edges.

Create Mosaics

Supplies

Polymer clay (various colors)
Acrylic roller and/or pasta machine
Cookie cutters and craft blade
Stamps ( rubber or any texture you find around your house)
Acrylic paint and brushes
Metallic powders
Varnish for polymer clay
Glue (Liquid nails or Weldbond are good)
Oven (don’t use you home oven)

Creating Mosaics

Paint white tiles as if they were little canvases using acrylic paint.. get creative! Use more than one color. Paint a single tile with multi colors or a landscape, try to make small pictures.. tell a story.

Mosaics with Texture

Cut the polymer clay until desired thickness, approx. 3mm ( see picture ). Gently stamp with your texture (I use toy palms in this case, you can use any texture like buttons, stamps, texture sheet, etc ). You can use mica powders or metallic powders to enhance the texture, then cut my tiles with the cookie cutters or a blade (squares are easy to arrange on you frame). I bake them following the instructions for the polymer clay brand. I don’t like to use a regular oven (fumes).

Mosaics with Stamps

Paint white tiles with acrylic paint, before they dry gently stamp them, it will take the paint off the tile creating a negative image of the stamp. Use rubber stamps for this and wash them after each use.

Making the Mosaic Mirror

I classify the mosaics by color, so they are easy to arrange when designing the mirror.
Arrange tiles on the frame as a puzzle and when you like the composition glue each tile. You may use ceramic tiles, milagros, beads, etc. just to have different textures and fill spaces when I don’t find the correct size of tile.
The last step is varnishing the tiles.

Use your imagination and have fun!

Create Mosaics
Crafts DIY

Knot Your Own Fortune Coins Necklace

03/25/2009

Hi, my name is Amanda Yu, I am the owner and designer of โ€Exotic Flavourโ€ the colorful, playful and creative jewelry design. I am grateful that I had been invited by Miseducated to prepare this DIY story for you. I hope you will like it. I will show you how to make this Fortune Coins Pink Necklace.

fortune necklace

Instructions

1. The material is very simple, prepare a Pink cotton cord (length: 155cm and thick: 3mm) and Sex piece of the round wood ornament with a hole in the middle.
2. Put on one wood ornament and make a knot. This is a part of the clasp.
3. Coil two small circles, hold tight with your left thump.
4. Round the third circle between the first two circles, pull the cord generally.
5. Put another wood ornament and repeat (3.) and (4.) until you have five patterns.
6. In the end of the cord I made an oriental cross knot and tight it nicely.
7. If you think it is complicated, you can make any knots you like. Just make sure the little circle is not too big for the wood ornament โ€“ other part of the clasp. (1)
8. The Fortune Coins Pink Necklace is now finished.

I hope you find this is inspiring. You can combine with different materials or perhaps develop another construction from this basic oriental knot. Here are two other creation I made earlier based on the same techniques.

Crafts DIY

Sew an Adorable Business Card Case

03/25/2009

I love this cute business card case. It’s an easy-to-make, quick project and it has such a big impact when it is finished. I love how easy it is to customize to your own taste (by choosing different colors and different ribbon) so it can really represent your own business style. I use a sewing machine to make it, but it would be perfectly fine to hand-sew the case if you don’t have a machine.

diy business card case

Supplies

1/8 yard of wool felt
12″ of ribbon (I used two pieces of 12″ ribbon in my case)
thread
optional: pinking shears

Instructions

1 Cut four pieces of wool felt: two pieces are 5.5″ by 4.25″, the other two pieces 4.75″ by 4.25″.
2. Fold the smaller piece in half so that the folded edge is the one that is 4.25″ across. Sew along the folded edge. I use the edge of my zipper foot as a guide when I sew to help make this seam straight – just line the edge of the fold up with the edge of your foot.
3. Optional: I use pinking shears to trim the seam and give the edge a more decorative look. You don’t have to do this step if you would like your edge straight.
4. Repeat with the other small piece of fabric.
5. Cut your ribbon in half. Pin one piece of ribbon onto each of the shorter edges of one of your larger pieces of felt. Fold the edges under your felt before you sew so they will be caught by your stitching and held securely in place. Stitch a seam across both edges of the ribbon to hold it in place.
6. Make a sandwich with all of your pieces: first lay your felt with the ribbon face down, then the other large piece of felt. Then place one of your folded pieces at each edge (with the stitched edges toward the center). Pin all these layer together so they don’t move while you sew them.
7 Stitch carefully around all the edges.
8. Optional: I use my pinking shears again to add a decorative edge to the bottom.
9. Yea! You’re finished! Fold your case in half, insert business cards into each side, and enjoy!

Crafts DIY

Create Easy Macaron Charms with Clay

03/25/2009

Finally, I was able to catch some sun through my tiny window and take some photos, so here is the step-by-step process to make polymer clay macarons!

Easy Macaron Jewelry

Instructions

1. Make 5 balls: 2 bigger, 2 smaller and 1 of a different colour
2. Slightly flatten the 2 bigger, and completely the 2 smaller
3. Put each “slightly flat” with a “very flat” and flatten the different coloured one too
4. Make a “sandwich” with the 3 of them
5. Ruffle what exceeds form the sandwich with an instrument like a tooth pick
6. Put it in the oven for half an hour (depends on the clay you use)
7. Do not eat!